Wednesday 10 February 2016

How To Access Computer’s Hard Drive With Smartphone


Access PC files on your phone
Yes, you heard that right. You can access your computer’s hard drive with your smartphone in few simple steps.  For this, you don’t have to download or install any big software on your PC or  smartphone. Your Android’s file explorer can do the task easily.
The good thing with this tutorial is that you can copy and paste big files, software, and other things easily to your phone at high speed. Let’s take a look at how this works:
To make this trick work, you should be connected to same network (Wi-Fi).
Step 1: Right click on the drive you want to share.  Use the below-mentioned path to share this folder. You will see an icon appeared which mean the drive is shared.
Properties> Sharing> Advance sharing>share this folder.
public-access
Step 2: In order to access files from hard drive with smartphone open ES file explorer.  Now click on the three linehamburger symbol then click on LAN
access-files-PC-android-1
Step 3: Now perform a scan and you will see  your PC if it’s connected to the same network. Now enter the username and password of your PC.  There you will see the shared folder. 
access-files-PC-android-2
Step 4: Here you will all the items in your computer’s drive. You can tap and hold to copy or cut any folder to your smartphone.
access-files-PC-android-3
I performed copy action and achieved nearly 5 Mbps speed.
access-files-PC-android-4

Sunday 7 February 2016

How To Manually Setup A VPN On Your Computer

A virtual proxy network is a helpful tool, whether you are moving around the planet or perhaps making use of an open Wi-Fi in the bistro in your local neighborhood. Using a VPN for your in your internet activity is a good habit, and the good news is that you do not have to pay for service anymore; it is possible to set up your own private VPN.
Before we proceed and set up a virtual proxy network on Windows 7 and later Windows operating systems, please make sure your uploading speed is as good as or near your downloading speed, since most of the internet service providers provide less uploading speed and more downloading speed. However, you can check by clicking here.
The Internet Protocol Addressing
Considering that a VPN connectivity channels network collectively, one has to be aware using the subnet and Internet protocol address, to prevent any issues. As far as the network hosting the VPN server, one can use a different IP address for the router, for instance, 192.168.89.1 and if you are using more than one router than you can go like 192.162.90.1, 198.162.91.1 so on so forth.
Incoming VPN Connection
In order to manage the VPN server(s), one must set up an incoming connection. Why, because this is going to be the host or primary, of your virtual proxy network. On top of other things, you will establish the users that you want on your connection. Instructions are below:-
1) In the ‘System Tray’ right-click the network icon select ‘Open Network & Sharing Center’ or in Windows 7 ‘Change Adapter Settings’.
2
2) Use the ‘ALT’ key to exhibiting the ‘File Menu’ and then click ‘File’ and then the ‘New Incoming Connection’.
Now select users who you would like to give access to and create accounts by ‘ADD’ing them. You can see the image above on how it should look like. Once you are done, hit ‘Next’.
3) Select ‘Through The Internet’ & hit ‘Next’.
4
Image Source: Google Image – Check box options for type of network selection for incoming connections.
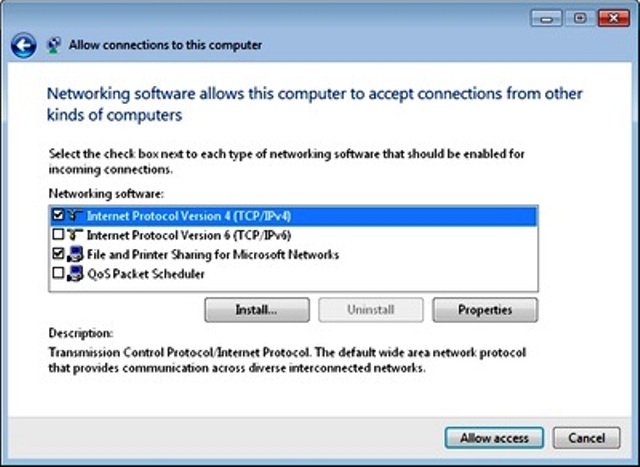
4) Select Internet Protocol Version 4 (TCP/IPv4), this will give IP’s to other connected users. As well as should you want the selected users to gain access to pictures, documents, or the printer (if connected to your PC) then enable those options for Microsoft Networks. Once you are ready, click ‘Allow Access’ and then it will take you to another window where you can hit ‘Close.’ At this point you should enter the ‘Properties’ of your incoming connection and establish the internet protocol address number for VPN clients:
1) On the ‘Network Connections’, double-click ‘Incoming Connections’.
2) Select the ‘Networking’s’ tab & double-click Internet Protocol Version – TCP/IPv4.
3) Once you are done with that select, ‘Specify IP’ addresses and enter an address within a range of your local subnet (keep in mind not to conflict the local DHCP). For instance, provided your router’s IP address is 192.168.89.1, you might enter 192.168.89.89 to 192.168.89.99, which will maintain ten clients.
4) Then hit ‘OK’ on this and the following dialog boxes.
Configure Your IP Address, Dynamic DND & Router
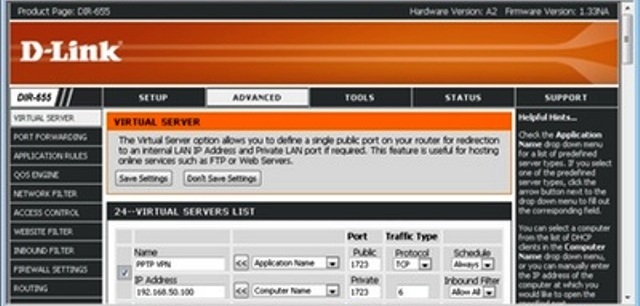
In order to allow VPN connectivity to the server PC from the web, you will have to establish one’s network device to forward the web-based traffic to the computer that is accepting the new connectivity. You will need to indicate the vendor or the principle computer through entering their local internet protocol address. So, until you establish the port forwarding, one must make sure that the internet protocol address will not alter.
lksjdflkj3
Image Source: Google Image – A screen shot of a Wi-Fi device control panel.
Begin by signing in to the online or on-router control panel. Next head to the Network or Dynamic Host Configuration Protocol settings and find if you’re able to rearrange or reserve the internet protocol address for that PC as an outcome it will always get the similar protocol. This is known as Dynamic Host Configuration Protocol reservation or Static Dynamic Host Configuration Protocol. Various network routers do not have this function. In such a case, you should yourself specify the computer a static IP address in the TCP/IP configurations that is going to be available in the networking connections. Upon getting out the internet protocol address, select the port forwarding or options in your network router’s control panel. Next create an entry forwarding port 1723 in the direction of the localized internet protocol address of the computer. See to it that you have saved the modifications.
Provided your web connection consumes a dynamic internet protocol address, instead of a static one, you’ll want to register and set up a dynamic Domain Name System or DNS service. The reason being any time you manage the online clients, you’ll have to enter the online internet protocol address of where the server computer is based. This could be an issue in case the IP updates. Then again, it’s possible to register to get a no-cost service, likeNo-IP, and insert the credentials into the device thus it can upgrade the hostname utilizing your IP. Now you will have a hostname (for example x.no-ip.org) to input inside online users, and that will continuously aim to the present Internet internet protocol address of your respective host computer.
Setting Up Outgoing VPN Connection(s):-
1) Being by right clicking the ‘Network Icon’ in the system tray and choose ‘Open Network & Sharing Center’ you can do the same for Windows 7 by selecting ‘Setup a New Connection or Network.’
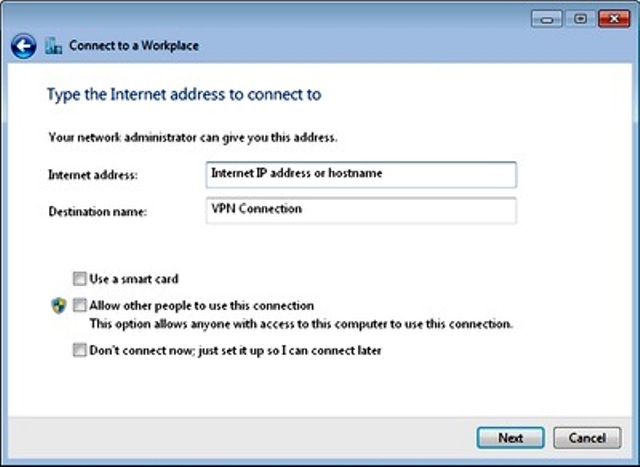
2) Choose use your internet connection (VPN) or whatever you named your connection.
8
3) Create the hostname via the online address and enter anything concerning the Destination title. As shown in the image above, keep all the options disabled and then hit ‘Next’ to continue.
4) Type the credentials that were created while you created the inbound Virtual Private Network interconnection, and then click ‘Next’. It is going to try to link making use of the appropriate protocols: Secure Socket Tunneling Protocol or SSTP, Point-to-Point Tunneling Protocol or PPTP, and after that Layer Two Tunneling Protocol or L2TP once linked, hit Close.
5) It will automatically allocate the link as being an Open or Public Network, restricting joint usability. Meaning you should change it. If not prompted to take action, open the ‘Network and Sharing Center’ or the ‘Public Network’ connection within the connection name. And then a window will pop-up, select ‘Work Network’.
If You Are Using Windows XP Using The Following:-
1) Start the ‘Network Connections’ screen and then click on then ‘Create a New Connection’.
2) Choose ‘Connect To Network’ and hit ‘Next’.
3) Pick VPN connection, and hit Next.
4) Input a term for the network, and hit Next.
5) Do not select the option that says ‘Do Not Dial The Initial Connection’, and then click ‘Next’.
6) Input the IP address or the hostname, and after that click ‘Next’ and then click ‘Finish’.
Limiting The VPN Traffic
Automatically, all the web traffic for the Virtual Proxy Network user would indeed go via the Virtual Proxy Network rather than the local Internet they are in connection with. This is exquisite if they are using an open connection, for instance like a hotel wifi hotspot, given that it maintains personal surfing private.
However, if you have a limited connection and do not want to waste your bandwidth with an open home or office network. You can limit the traffic passing via the VPN connection:-
1) Open ‘Network Connections’, once there right click the ‘VPN Connection’ option and select ‘Properties’ from the drop-down menu.
2) Choose the ‘Network’ and then enter Internet Protocol (TCP/IP).
3) Once in, hit on ‘Advanced’ and remove the selection for ‘Use Default Gateway’ from the remote network after that hit ‘OK’ and save the changes.
4) This will allow the virtual proxy network to use the web connection whenever a person is surfing the world wide internet.
Connecting To The Virtual Proxy Network
As far as Windows XP is concerned you can connect and disconnect by launching the Network Connections panel by right clicking on the Virtual Proxy Network connection, and you can click the small computer with a cable, signals or network icon and select the Virtual Proxy Network connection(s) in Windows 7. And once you are linked you will be able to browse the shared resources on the server or host machine, but you would have to access the shared files manually. After you connect, you should be able to access the shared resources on the VPN host network. Remember; you will need to gain manual access to shares files by entering the host’s IP address following the file path.

How to run multiple WhatsApp accounts in a single Android device using OGWhatsApp and Switchme App

 Wanna run multiple WhatsApp accounts in a single Android device……….Yes it can be done by downloading new OGWhatsApp and Switchme App.

Whatsapp is the new trend nowadays which is popular among Android users to stay connected with family and friends. WhatsApp is a free app and helps in sending and receiving text messages, images, videos, files etc via internet not only that it has also recently included the WhatsApp call facility so it is one of the most easy User Interface app liked by millions across the globe.
Till now users could have only one WhatsApp account at a time linked to their phone number however Android has now introduced two new apps for their users which allows multiple WhatsApp accounts on a single Android device. Of the two apps one app does not need to be rooted to the device while the other needs to be rooted to the android device to allow the multiple WhatsApp accounts.
OGWhatsApp: This is an Android app which would allow the Android user to use two WhatsApp accounts on a single Android device without the need to root Android device. By following the steps listed below users can use one WhatsApp account on the OGWhatsApp while the other account can be run through the normal WhatsApp.
  • Users need to first take a complete backup of their WhatsApp chats and data.
  • Next step is to Clear the WhatsApp data : Go to  Settings>apps>WhatsApp>Clear Data.
  • Users would then need to navigate through file explorer to sdcard/WhatsApp folder and rename it. This is done by Going to /sdcard/WhatsApp folder and renaming it to /sdcard/OGWhatsApp.
  • Now the original WhatsApp needs to be uninstalled from the Android device.
  • Now install the OGWhatsApp in the Android device using this link: http://apk2day.net/download/houKI7ip0xf4tHPDeK1cMmFuUHNfQlgyd3ZicGg1d0ZuU19YWGNrQnNkNDJfaTB2bl84XzgzOVA1eDQ
  • OGWhatsApp once downloaded will ask for a phone number:“Remember” to give the old phone number that was already registered with the official WhatsApp earlier.
  • OGWhatsApp is now ready with your old phone number.
  • Now, download and install the official WhatsApp from your play store.
  • This app will again ask for a phone number and now register the second phone number and also give a different smartphone number for verification.
  • With the verification the WhatsApp will resume with your second number.
  • Users can thus enjoy two WhatsApp accounts on single Android device using OGWhatsApp without even the need to root Android device.

Switchme App: This is another Android app that can help users to have two WhatsApp accounts using a single Android device having the dual SIM mode, however this app requires theAndroid device to be rooted for it to work. Switchme App allows the log in and out of multiple user spaces similar to that of the desktop computer however it needs root access to do this. Also here each account within the multiple account will have its own settings, applications and data due to this user cannot access the other data profile from their current profile.
  • Rooting of Android device: Lets understand the rooting of Android device. For “Rooting the Android device” users need to first down load the “One Click Root” app fromhttp://www.oneclickroot.com/ and with just a click the Android device can be rooted to Android system. Basically Android rooting would give the users of Android device full access to the Android system within the device, to make any changes as per user’s will and wish. Users need to be very careful and need to follow the instructions carefully as they are now administrators of the system. Lets see how this rooted device can suffice our need of getting two WhatsApp accounts.
  • Next users need to down load the Switchme App from the given link:  https://play.google.com/store/apps/details?id=fahrbot.apps.switchme&hl=en
  • Open the Switchme App and it will ask for Superuser request which users need to grant.
  • User would need to create a new account in this Switchme App (user can user their own name for this new account). This profile being an administrator account will contain all the current apps and settings, it will also reflect the WhatsApp profile which is already installed in the Android device.
  • User would now need to create another account in the Switchme App using a different name. Further user would need to choose the Switch option by selecting this account.
  • With this switch option the device would reboot automatically.
  • Once the device boots back user will not be able see any app that has been installed in primary account. Now user needs to install official Whatsapp again from play store and register it for different SIM / phone number. The Thumb rule which users might already know is that only one WhatsApp account can be registered per phone number.
  • It could be a possibility that the SIM that user is registering in the WhatsApp is not present in the Android device, then user would simply need to choose the “Call me option” during the verification and get the code through the call and put this in the WhatsApp verification page. Thus the new WhatsApp will be registered with the second number!!
  • User will have to switch their profile for using the WhatsApp accounts.
  • Switchme App free version allows only two WhatsApp accounts for user.
So for Android users who are comfortable with rooting of device and switching the profiles can use Switchme App whereas for users who are not much acquainted with the rooting process can use the OGWhatsApp and have multiple WhatsApp accounts on the same device, indeed a thoughtful gesture of Google Inc

Friday 5 February 2016

How to Unlock Pattern Lock or Password In Android Smartphone Without Losing Data

Android is the most used Mobile OS in the world and Engineers from Google work so hard to make it more secure after every update. If you ever forget your mobile pattern or password you can reset your mobile and get your device back. But in this case you will lose all your data if you want to recover  your device without losing data. Follow the below steps. Hope this article will help you.

Method 1st:- Unlock Pattern Lock On Android Without Losing Data

  • Download Aroma File Manager.
  • You android device either locked by pattern lock or password lock.
  • A memory card for android device.
Step 1. After downloading Aroma File Manager, place it in your memory card (SD card). Insert the memory card into your locked android device.
Step 2. Open Stock Recovery Modewith reboot your android device and pressing Power Key and Volume up key simultaneously. Different phones may be have different methods to open stock recovery mode so if you face any problem Google it.
Step 3. After entering into recovery mode use Volume+ and Volume- buttons to scroll up and down. For select use middle button.
Step 4. From there click on “Install Zip from SD Card” and give a path to install “Aroma File Manager” from SD card.
Step 5. After installing, it will open in recovery mode.
Step 6. From the Aroma File Manager navigate to settings >> go to bottom and click on“Automount all devices on start” and then exit.
Step 7. Repeat Step 4 & 5 again.
Step 8. After this you will get “Aroma File Manager” opened again.
Step 9. Now navigate to Data Folder>> System Folder  and find >>“gesture.key” or“password.key” for pattern lock or password lock respectively.
Step 10. Delete that any one file and then exit aroma file manager and reboot your android device. After rebooting you will notice that password or pattern lock not removed. But don’t worry draw any pattern and you will open your android device but remember or note that pattern.

Method 2nd:- Unlock Pattern Lock On Android Without Losing Data

1. First Requirement is Download Android SDK and here I will show youHow To download and install Android SDK Tools.
  • Download and install Android SDK Tools  to run ADBcommands. Now select platform according to your download and install it.
  • After installing open it, unchecked the other packages and check Android SDK Platform-tools and then click on install packages according to the image given below.
install-sdk-platform-tools
2. So the other requirement is USB Debugging should be enabled before your android device is locked.
3. The process will not be helpful if you doesn’t have specific and compatible drivers for your phone. So you should be very careful While installing your device compatible drivers.

Steps To Unlock Android Pattern Lock

Step 1. Connect your locked android phone with PC/Laptop via USB.
Step 2. Open folder where you installed Android SDK Tools Users >> App Data >> Local >> Android >> Android-SDK >> Platform-Tools and then click on blank space hold shift and click right mouse button and select “open command window here”.
how-to-unlock-android-smartphone-pattern-lock-withou-data-losing
Step 3. It will open you command window now you have to put some commands in the command window:-
For check your device is connected or not put command:-
adb devices 
unloack-android-pattern-lock-without-data-losing-command-image
Now put these commands:-

adb shell
cd /data/data/com.android.providers.settings/databases
sqlite3 settings.db
update system set value=0 where name=’lock_pattern_autolock’;
update system set value=0 where name=’lockscreen.lockedoutpermanently’;
.quit
If above commands not working put:-
adb shell rm /data/system/gesture.key
Step 4. Once you done you have rebooted your android device. Now its all done.
After rebooting your device you will see the pattern lock disabled. So in this method USB Debugging should be enabled before locked and it is must. But If it is not enable then you cannot proceed further steps.

Method  3rd:- Unlock Pattern With Factory Settings (Data Will Lost)

If you don’t have a PC or if USB Debugging is not enabled then follow the below steps
Step 1. First Switch off your Locked Android Device.
Step 2. Now, boot your Android device into “Recovery Mode” using specific keys by holding power key and volume up key simultaneously.
Step 3. After opening Recovery Mode
  • Select “Factory Data Reset” option and give “Yes“.
  • Select “Wipe Cache Partition” to wipe cache data.
Step 4. After above steps Reboot your device.
Step 5. All Done ! Now, your device will start from the scratch.

Thursday 4 February 2016

What Is The Difference Between HTTP And HTTPS?

In your browser’s address bar, the URL of every website you visit always starts with either HTTP or HTTPS, the latter one considered more secure. You might have noticed that numerous times while you were busy with your internet life, didn’t you? Even Facebook with almost a billion daily active users flaunts its status as of a HTTPS website and you confidently post your personal information without giving it a second thought. What if it gets into the wrong hands? Well, you know chances are less such blunder ever happens on theFacebook planet.
So, whether it is Facebook or online payments involving your credit card information, all you want is HTTPS written as the URL. So, why the simple HTTP website isn’t used for online payments or storing your personal data? There is an obvious difference between the two.

What is HTTP?

Hypertext Transfer Protocol it stands for, which your teacher made you learn by heart in your 4th grade. It is a request/response protocol based on the client/server communication mode. A client or user agent is your web browser or any other device which can access, receive, and display web content.
The client sends a request message to a server which hosts HTML content, replies with the response message that may contain the requested HTML content by the client. The response message is a confirmation that the server has successfully received the Request message.
So, HTTP can be considered as a rule book that your web browser refers, like, what to do when you press enter after typing a website address. It is a Stateless protocol which means there is no relation between two consecutive HTTP commands given to a website. Furthermore, there is a list ofStatus Codes used by the web server to inform your browser if there is any problem. For example, “404 Not Found” is used when the webpage is not present at the URL entered in the browser.
The credit for the original development of HTTP goes to Tim Berners-Lee – who proposed the idea of the ‘World Wide Web’ – and his CERN team, which was developed alongside the HTML (Hypertext Markup Language). The very first HTTP documentation was published in 1991 as HTTP/0.9 which consisted of only one method GET. The development progressed, with HTTP/1.0 in 1996 and HTTP/1.1 in 1997.
HTTP/1.1 facilitated persisted connections (more than one request/response on the same HTTP connection), improved caching, new status code, Enhanced compression support, OPTION method for Cross Origin Resource Sharing in web application and much more.
HTTP uses the reliable TCP (Transmission Control Protocol) Port 80 to send and receive data packets over the network for internet applications like email, World Wide Web, File Transfer, etc. However, it also utilizes UDP (User Datagram Protocol) which is an unreliable protocol but contributes to reduced network latency used for live streaming (not to be confused with preloaded videos on YouTube) which requires continuous packet flow done at the cost of minor packet loss during the transmission.
The latest addition to the family is HTTP/2, developed by Hypertext Transfer Protocol Working Group of the Internet Engineering Task Force. This specification was approved as a Proposed Standard by IESG in February 2015 and was published in May 2015. It has been adopted by all the famous web browsers.

What is HTTPS?

The development of HTTPS began in 1993 by Netscape Communications, an AOL company, who had their famous Netscape Navigator web browser in the 1990s. Originally implemented with SSL (Secure Socket Layer), the HTTPS protocol was later upgraded to use SSL’s newer transformation TLS (Transport Layer Security). It also uses TCP to send/receive the data packets but uses a different Port 443 in order to do so.
The ‘S’ stands for secure in HTTPS. Now, what does it mean in laymen terms? A website which uses HTTPS protocol establishes an encrypted connection with your device. So, if you try to send some data to the website, say any name, like Steve Jobs. The encrypted form will look somewhat like ‘xkndsoumnkjbktkctfc’. And you can’t understand it, do you?
The data to be transmitted is encrypted using a Public Key which is then used by the recipient to decrypt it. The public key is created by a server administrator or a user, which is included in a digital certificate known as SSL Certificate and is signed by certification authorities like VeriSign. Any act which involves sharing of the Public key to unknown devices must be prohibited, as it may compromise the level of encryption, ultimately leading to disclosure of personal information or user credentials.
Most modern web browsers now feature inbuilt support for HTTPS protocol. A web browser integrated with HTTPS protocol requires SSL Certificate signed by certification authorities in order to authenticate a server or a website. You might have seen a green coloured padlock placed before HTTPS in the Google Chrome address bar. Once you click it, the certification authority information of the website will be presented to you.
The HTTPS website you’re visiting must provide a valid certificate to your web browser in order to gain browser’s trust. If it is unable to do so, the browser will display a warning message. So, the website obtains it either for free or after paying some bucks to the certification authorities.
Basically, HTTPS is simply an HTTP connection wrapped in SSL/TLS encryption layer. All done to protect the integrity and privacy of the data being transmitted and the assurance that it won’t fall into wrong hands while in transit. Its main motive is to check the authenticity of the website being visited. An unsecured connection like a public WiFi network might serve as the medium for man-in-the-middle attacks and eavesdropping.

The Difference between HTTP and HTTPS

In a nutshell, HTTPS can be regarded as an advanced modification to HTTP equipped with more security. However, HTTP uses Port number 80 while HTTPS uses Port number 443 by default and that differentiates the two a separate connection types.
The sole intention of HTTP is to display the information on the recipient device without bothering about how the data gets transmitted between two devices. And it is the same for HTTPS, the only advantage is, it packs an extra layer of security by using SSL/TLS which is also utilized by VPNs to encrypt data, thus protecting from eavesdroppers.