http://www.makeuseof.com/tag/how-to-erase-your-web-accounts-in-one-click/
Wednesday, 21 December 2016
How to Access Blocked Websites
Here are some ways to access your favourite blocked website
1. Become Anonymous: Use Proxy Websites
Very often, in a professional environment, the employers draw certain boundaries, restricting your the access to some particular websites. At times, you need a way to access the blocked websites and in those situations, proxy websites act as a rescue method.
On the web, there are hundreds of proxy websites that make your web experience ‘unrestricted’. A proxy website becomes a moderator between the user and server site. The proxy website camouflages the blocked site from the ISPs and allows you to access blocked websites. To get a proxy website for any blocked site, just perform the Google search.
Eg: Facebook Proxy Server. In case, Facebook is blocked in your institution, or you can go to —
http://www.spysurfing.com/
https://www.hidemyass.com/
http://proxify.us/p/ and more…
2. Use VPN
VPN or Virtual Proxy Network allows you to connect your device to a secure connection to another network over the internet. VPN enables you to access blocked websites from your home network and puts your IP address in a land far away. You can also download the apps or open the sites blocked in your country.
VPN acts as a tunnel that converts your data into garbage value that’s difficult for anyone to sniff and recognize. There are tons of free/cheap VPN services that one can use and enjoy an uninterrupted internet experience.
If you are into exploring ways to enhance your computer security, you can also go for the deadly combination of TOR and VPN.
Check out our how to set-up VPN on Android devices without the need of any software. You can also read our detailed article on what is VPN and how it works.
3. Use IP Rather Than URL
The blocked website sometimes are stored as a list of URLs and using IP of the website might work in few of the cases. To get the IP address for any website, you do a ping domain.com command in Command Prompt. Using IP is a simple way to access blocked websites in your region. However, if the website had hidden its IP too, then it won’t open with this method.
All you need to do is run CMD on your computer. Now type “ping www.websitename.com” and press Enter. This will promptly return the IP address. Now enter this IP address in your web browser’s address bar and hit Enter.
4. Change Network Proxy In Browsers
Your college or institute might be having more than one proxy for its network. So, it happens that some websites are restricted on one proxy, but accessible in another. So, you can give a try to proxy surfing to access blocked websites in your college.
Disabling the network proxy settings in our web browsers isn’t a tough task. You just need to find the connections/network option in the settings of your web browser. There, you can select the no proxy option or use another one that’s providing unrestricted browsing at your institution.
5. Use Google Translate
Institutes or even countries sometimes don’t ban Google Translate. So, you can bypass the restriction by converting the blocked website into some other language that you may know. Try Google Translate and see for yourself. It is yet another simple way to access blocked websites.
You can also use Microsoft’s Bing translation service to unblock a banned website.
6. Bypass via Extensions
If the websites that are blocked by your institute or office are dynamic in nature such as Facebook or YouTube, then you should give a try to these extensions. Hola and ProxMate are some extensions that you can use to access blocked websites.
7. URL recasting
There are instances when a particular website is hosted in VPN and it doesn’t have a verified SSL installed. For such websites, you can simply go to the address bar of your web browser and try typing https://www.url.com, instead of accessing www.url.com or http://www.url.com. This change might display a security notice. Press on the Proceed Anyway option and visit the website.
8. Replace your DNS Server
We’ve already discussed this method under a separate topic named DNS Hack. You can simply use this method and bypass the blockade. This method generally involves using Google DNS or OpenDNS for accessing the internet.Here are the detailed steps on the same.
9. Go to Internet Archive — Wayback Machine
Wayback Machine is an interesting service that stores a copy of most of all website on the internet. It saves multiple versions of a website and you can use it to access the past versions of a website. The users can also use it to browse the blocked content online.
10. Use RSS Feed
RSS readers are useful for getting the fresh content and reading them with ease. You can grab the RSS feed of the blocked website and add it to your reader. Just in case that website doesn’t have an RSS feed, there are some useful online services to create the feed.
These are some of the most effective and easy to use methods to circumvent the censorship that has been put on your favorite websites.
Tuesday, 20 December 2016
Why Is Google Trying To Murder HTTP Connection Used By Websites
Modern times have witnessed a more sophisticated way of stealing data and stalking a person on the internet. The HTTP connection used by many websites is enough to lure malevolent minds to fulfill their intentions. Google is determined to demote the adoption of HTTP connection by websites.
The reason behind this objective is that the HTTP connection is not secure. What does that mean? If a website uses an HTTP connection, the passwords and credit card details you type there are sent in plain text over the network making it possible for any middleman to read all of it. And it is not only about the credit card numbers, a website using an HTTP connection can be modified by a person before it reaches your computer.
Another matter of concern is that people don’t give a second thought while accessing a website that’s not secure. The security indicators placed in web browsers are left unnoticed. Hence, the situation becomes more alarming.
Google wants the websites to shift to the HTTPS connection which uses SSL/TLS encryption to send data. So, when you type your credit card numbers they are converted into random-looking characters before being sent over the network.
“Beginning in January 2017 (Chrome 56), we’ll mark HTTP sites that transmit passwords or credit cards as non-secure, as part of a long-term plan to mark all HTTP sites as non-secure,” writes Emily Schechter, Google Security Team.
Schechter notes that a significant number of websites have transitioned to HTTPS and the number is increasing. “We recently hit a milestone with more than half of Chrome desktop page loads now served over HTTPS,” she writes.
In the coming months, Google will extensively encourage the frequency of “not secure” warning label on HTTP web pages in Google Chrome. Initially, HTTP warnings would be displayed in incognito mode and for all the web pages after some time.
HTTPS has many advantages over the HTTP connection and it helps in protecting your confidential information. Google is not alone acting to boost the adoption of HTTPS. A few months ago, the website hosting platform WordPress turned on HTTPS for all of its websites for free. Check out how an HTTPS page loads faster than an HTTP page.
How To Download YouTube Videos Using VLC Media Player
VLC is one of the most popular media players around. This free and open source media player became popular a long time ago as it was one of the first ones that “played anything”. Its simple UI can disguise the new users who might consider it less advanced. Few people know that VLC media player packs a wide range of features.
In our previous article, we’ve already told you how to convert a media file to any different format using VLC. In this article, I’m going to tell you how to download videos from YouTube using your favorite VLC media player.
Steps to download YouTube videos using VLC?
The method to download YouTube videos using VLC media player is very simple. Here are the steps that you need to follow to complete this task:
The first step involves opening some YouTube video and copying its URL from your web browser’s address bar. Here, I opened the Fossbytes YouTube channel and looked for the how to make Chrome faster tutorial. After that, I simply copied the path of the video from the address bar.Now you need to open VLC media player on your computer. I’ve written this tutorial using Windows 10. So, the appearance and placement of different options might differ on your Mac or Linux PC.In VLC, find the Open Capture Device option and click on it. It should open a new window.
Now click on the Network tab and paste the copied URL in the empty field that’s titled Please enter a network URL. Now click Play button.
This should soon start playing the YouTube video in your VLC media player. You can use the media controls in VLC just like the YouTube controls and use them to play, pause, or stop the playback.
Now, in Tools option, click on Codec information.
It’ll open the Current Media Information window that’ll show codec information. There’ll be a link under Location. It’s basically the download link and you need to copy it.
Now you need to open your web browser and paste the copied download link in the address bar and hit Enter. This would either start the video playback in your web browser or directly show you the download dialog. Simply click on the Savebutton to grab the video.
Here’s the downloaded video in all its glory:
Saturday, 17 September 2016
How to Fix Windows 10 Slow Performance Issue and Increase Overall System Speed
 Short Bytes: Many Windows users are facing Windows 10 slow performance issue in Windows 10. This appears in the form of input lags and could be fixed by tweaking some Page File settings in Windows 10. So, how to fix this slow performance issue in Windows 10 to boost system speed? Here is the answer.
How to Fix Windows 10 Slow Performance Issue and Boost your System Speed?
How to fix Windows 10 Slow performance:
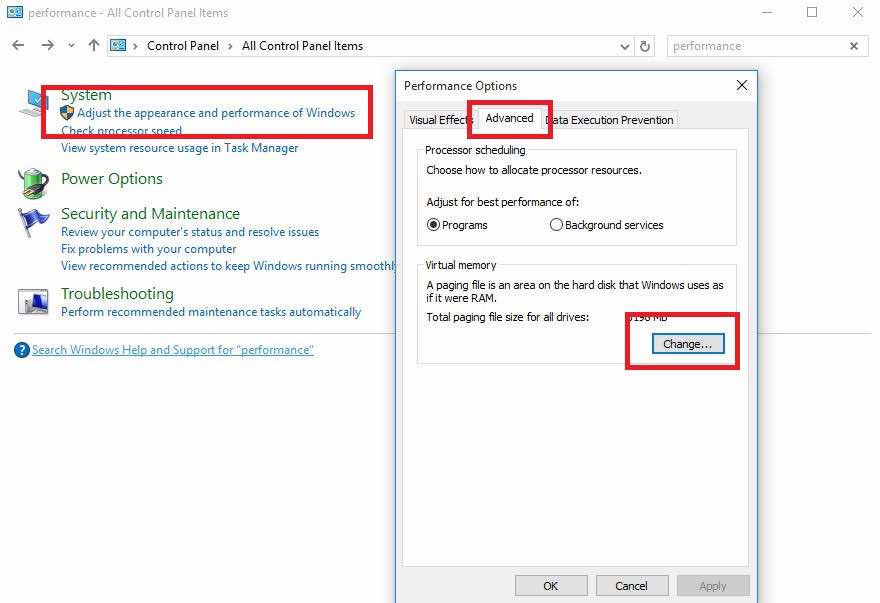
- Open Start Menu and find the Control Panel. Click on it.
- Here in the Control Panel, go to the Search field at the top-right of the window and type Performance. Now hit Enter.
- Now find Adjust the appearance and performance of Windows.
- Go to the Advanced tab and click on Change in the Virtual Memory section.
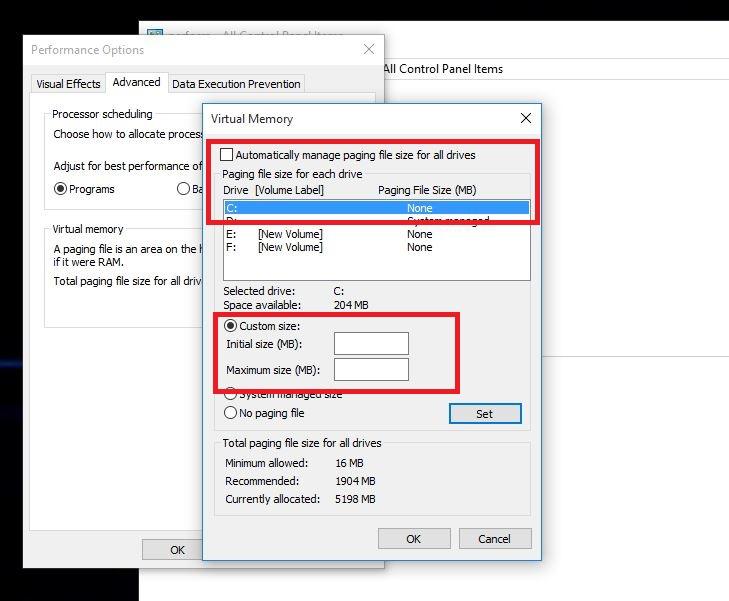
- Now untick the option “Automatically manage paging file size for all drives.”
- Select the default C: drive where Windows 10 is installed and then choose Custom Size. Then change Initial Size and Maximum Size to the recommended values by Windows (given below).
- Now click Set and then hit OK to save the settings.
- Reboot the computer for the changes to take effect and fix the slow performance issue in Windows 10.
Teardrop Attack: What Is It And How Does It Work?
 Teardrop attack is a type of Denial of Service (DoS) attack which exploits the fragment offset field in the IP header to produce buggy fragments which are then delivered to the target machine. Unable to rearrange the fragments, the victim keeps on accumulating the fragments until it crashes.


