Wednesday 28 December 2016

How To Set-up VPN on Android Devices (No Software Needed)

With hackers and in fact sometimes our own governments lurking around, looking for just one opportunity to steal your data, you might want to give serious reconsideration before connecting. Somehow the idea of my bank credentials and personal information resting in someone else’s hands doesn’t seem to be very enthralling to me.

So how to overcome this problem? Simple just configure a Virtual Private Network (VPN).


A VPN would allow you to connect your device up to a secure connection to another network over the internet. In fact you can use it to access your home/company network while you are away, download apps which are not available in your country or simply keep your browsing and data secure over the public network.

So here is how to go about setting a VPN on your Android device:

Step 1. Go to Menu > Settings

Step 2. Now Click on More

Step 3. Now click on VPN and a screen like this one would open up:

Step 4. Now tap on the ‘+’ button at the right corner of the screen:

Step 5. Here enter a Name for the VPN connection, select the type of VPN server you are connecting to and enter the VPN server’s address and then click save.

Step 6. Now just tap on the created VPN to connect. You will be prompted to enter a username and password. After entering which you can connect to the VPN.

Once you are connected you will see a Key Icon / “VPN activated” notification in the notification drawer. In case you want to disconnect, simply tap on the notification and tap Disconnect.

Bonus Tip: In case you want to ensure that your data is always sent over a VPN, for instance while using a public Wi-Fi network all you need to do is this:

Connect to a VPN, save your account information and then click on the three dots icon at the corner of the screen. After that click on the ‘Always-On VPN’ icon to access this feature.

Note: I would advise readers to change their Screen Lock over from ‘Slide’ to ‘Pin’ or ‘Password’ otherwise they might get this error:

Also, sometimes you might be prompted with this:

Be careful because randomly entering passwords may cause your credential storage to be erased.

Now there is absolutely no need to freak out. Here is where our first tip would come in handy, just simply change your PIN and the question will go away as the credentials would have been forced to be updated.

Monday 26 December 2016

Switch Vs Router: Differences And Comparison Of Their Working Functionalities

Switches are very popular as a layer two device whereas a router is very famous for being a layer three device. So, what is that something special that makes router the most popular layer three device? We will take a look at all the differences and functional aspects of a switch and a router

Let’s take a look:

Switch vs Router — Comparison and differences

Switch’s properties:

Works at the Data link layer of the OSI layerUses ‘filter and forwarding’ when it receives a data packet in form of a frameA virtual LAN can be created using a Switch which inside the same LAN separates the LANs and make them virtual to each otherUsually comes with 24 to 48 portsTransmits Frames (layer 2 packets) and Layer 3 packets of the OSI modelUses its software for admin access and other configurationsHas its own memory for memorizing the devices connected over to the networkCan learn the MAC addresses and stores those addressed in a CAM (Content Addressable Memories)Supports Half as well as full duplex transmission modeA hub has only one broadcast domainCan support Spanning tree protocolNo packet collisions occur commonly inside a SwitchNo dynamic sharing of the bandwidth

Router’s properties:

Connects more than two networks unlike a SwitchWorks as a traffic police to direct a data packetCan be used for LAN, MAN, and WANIts packet is called a packet unlike a frame at layer two and electrical signal at layer oneIt works at layer three or also known as network layer of the OSI layerIt usually has 2-4-8 portsIt also stored Ip addresses in a table called Routing table and from there, it decides where to send the data packetIn router, every port has its own broadcast domainDynamic bandwidth sharingFaster processing than a switchCan perform Network Address Translations (NAT)

Working differences — Switch vs router

Before you proceed to further reading, have a look at the basic concepts of the different networking devices and hardware types — hub, switch, router, modem, bridge, repeater.

Let’s say around fifty computers are connected in a local area network. In the network, there is also a common resource from where computers can download data locally. So, this network forms a kind of a private network. However, when one of the computers would want to get some data from online sites like Facebook or Google, they will have to go to the internet and fetch the data and that makes a public network

So, when a computer wants to access a public network, it sends a data packet to the Switch which is the next immediate device in terms of data transmission. The switch opens up the packet and looks for the destination where the request packet wants to go.

The packet is directed for the public internet or world wide internet and Switch has no idea about it. So, Switch forwards this packet to the router — ‘The default gateway’. A router works as a gateway that is more like it is a door to the outside world and gets the data that a particular computer wants.

However, inside the campus, all the computers are a part of the private network which is not known to the outside world. So, it tweaks the private packet into the public packet and vice versa. This is called NATting which we will cover in the later topics.

What Is HTTP/2 And How It Works

HTTP 1.1 was a major move from HTTP 1.0 as it allowed persisted connections (more than one request/response on the same HTTP connection), improved caching, new status code, Enhanced compression support, OPTION method for Cross Origin Resource Sharing in web application and much more.

HTTP/1.1 has served the Web well for more than fifteen years, but its age is starting to show. Loading a Web page is more resource intensive than ever, and loading all of those assets efficiently is difficult because HTTP practically only allows one outstanding request per TCP connection.

Because of which, many TCP connections are created to issue parallel requests. And since there isn’t any limit on this; too many connections are used most of the times which leads to TCP congestion and unfair resource usage by browsers. It also means lots of duplicate data being transferred “on the wire”.

If too many requests are made, it hurts performance. This has led the industry to a place where it’s considered Best Practice to do things like spriting, data: inlining, domain sharding and concatenation. These hacks are indications of underlying problems in the protocol itself, and cause a number of problems on their own when used.

HTTP/2, on the other hand, enables a more efficient use of network resources and a reduced perception of latency by introducing header field compression and allowing multiple concurrent exchanges on the same connection. It also introduces unsolicited push of representations from servers to clients. This specification is an alternative to, but does not obsolete, the HTTP/1.1 message syntax. HTTP’s existing semantics remains unchanged.

At a high level, HTTP/2:

is binary, instead of textualis fully multiplexed, instead of ordered and blockingcan, therefore, use one connection for parallelismuses header compression to reduce overheadallows servers to “push” responses proactively into client caches

Wednesday 21 December 2016

Difference Between HDMI, VGA, DisplayPort, DVI, Thunderbolt, And MHL

If you want to connect your laptop to your TV or monitor, the most common thing to go for is HDMI. However, there are other cable options like DisplayPort, DVI, Thunderbolt, and VGA which are in existence since almost three decades.

All these different interfaces have been designed to carry video signals (and audio signals) from one device to another. So, what’s the thing which sets them apart? If you’re thinking it’s the video quality, then you might be correct only in the case of VGA. As for other connection interfaces, the video quality is almost the same.

VGA

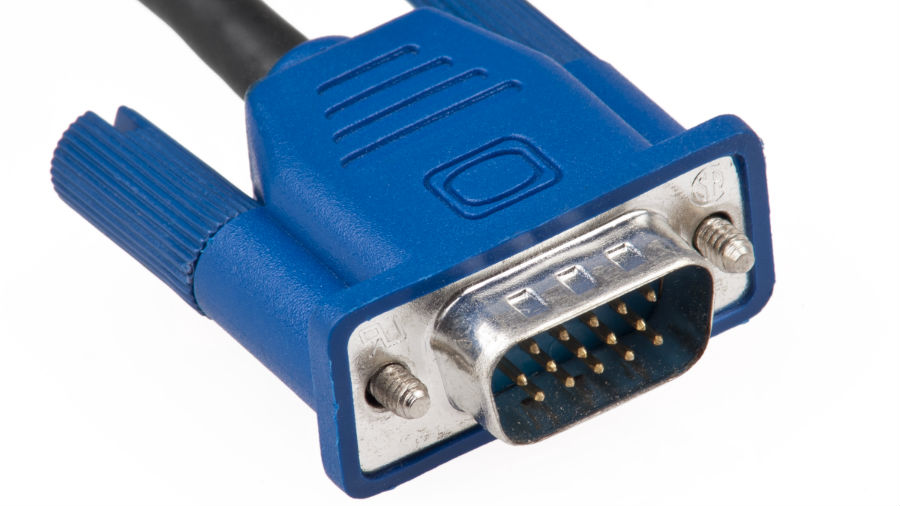
It stands for Video Graphics Array and it’s probably the oldest display connector which can still be seen on a number of devices. I have a VGA port on my old Dell Inspiron. But the VGA connector, for obvious reasons, has started to lose its place on various devices for more advanced technologies. HDMI is an alternative in most cases. For Apple, Intel’s Thunderbolt is the interface used to push video content out of their laptops to display device.

VGA was originally created in the year 1987 by IBM as a display hardware. But it is widely recognized by people as the 15-pin D-Sub connector on the desktop machines which comes with screws to lock the connector with the VGA port.

VGA can support a video resolution of 1080p (and higher), but that’s not the thing which can help it to compete against newer technologies. This is because VGA uses analog signals to carry video from source to the receiving device. And it contributes to a degraded picture quality, often visible when compared to other interfaces based on digital signals.

A separate audio connection is required if you want to throw videos using VGA cables as it lacks support for the same. The length of the VGA cable, in addition to the quality of the material, can affect the intensity of signal degradation. Moreover, a low-quality VGA cable may also suffer from signal crosstalk or ghosting, in which signals from other wires in the vicinity can introduce unwanted currents.

DVI

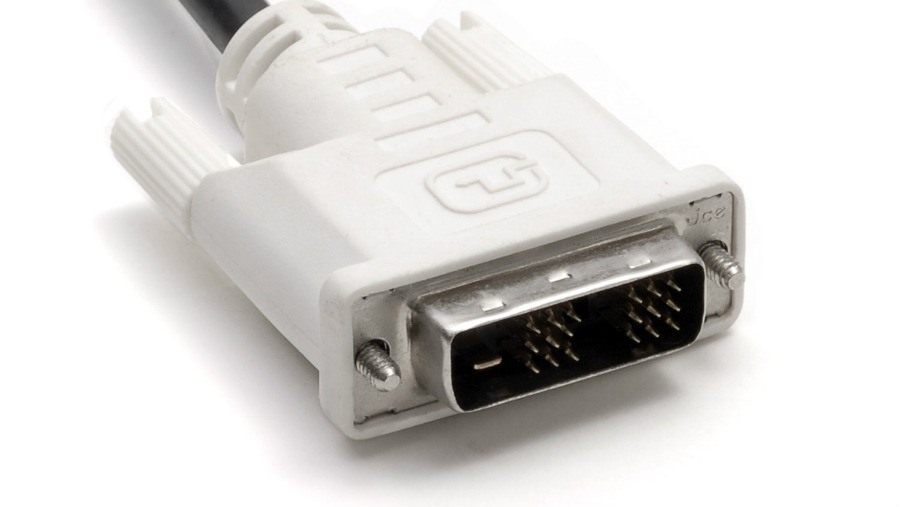
Digital Visual Interface is the one to follow the legacy of the VGA connector, but by taking the digital path. DVI, created by Digital Display Working Group, was introduced in the year 1999. The 29-pin connector shares visual traits with VGA connector and sports the screw locks.

DVI interface can push uncompressed digital video streams to a receiving device. In the case of digital signals, it can support WUXGA (1920x 1200) resolution @ 60 Hz via Single Link, and WQXGA (2560 x 1600) @ 60 Hz via Dual Link.

DVI also supports analog video output which makes it backward compatible (using an adapter) with the VGA interface. DVI might be relatively newer than VGA, it has mainly found its place on computer monitors. However, the technology is also on the verge of extinction.

DisplayPort

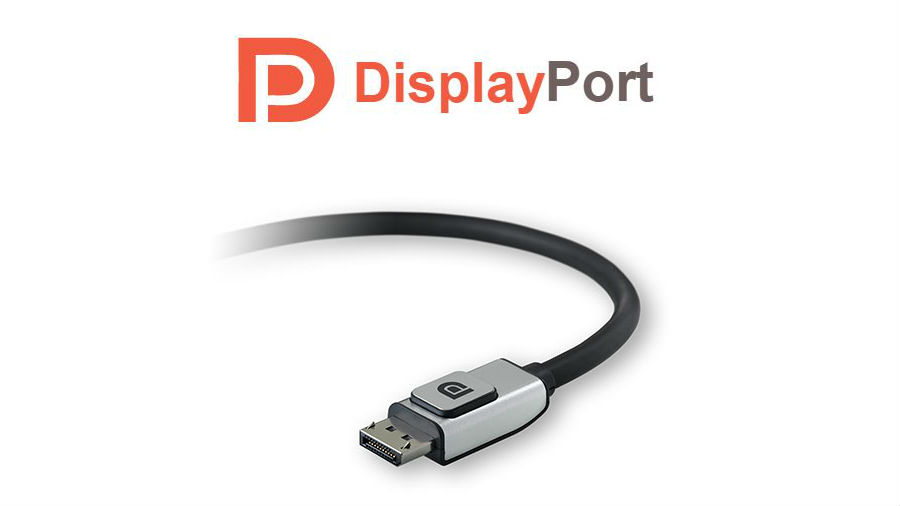
Launched in 2006, DisplayPort is a lot younger in comparison to VGA and DVI, and even HDMI. It is backward compatible with these interfaces. Just like DVI, it is primarily intended to be a computer connection interface.

According to the newest DisplayPort 1.4 specifications, it can support HDR and up to 8K video output on compatible devices. It also deploys a something known as Display Video Compression, which is claimed to deliver visually lossless video over a DisplayPort connection. Nvidia’s GeForce GTX 1080 is the world’s first graphics card to feature DisplayPort 1.4.

VESA, the creator of DisplayPort wants to put it as a considerable option for audio/video connection. They’re constantly adding support for various technologies to maintain pace with HDMI. Dynamic metadata support is available with DisplayPort 1.4 for HDR-compatible devices. It allows content creators to configure HDR for individual scenes.

An advantage of using a digital video connection is the implementation of DRM to prevent unauthorized playback of copyrighted content. Earlier versions of DisplayPort added support for DPCP (128-bit AES encryption), but the 56-bit HDCP was favored with the release of DisplayPort 1.1. Now DisplayPort 1.3 comes with HDCP 2.2.

DisplayPort comes with various other perks. A variant known as DisplayPort++ (or Dual-Mode) can be used to throw out HDMI and DVI-compatible video content using the same hardware. Also, VESA has figured out a method to use Type-C USB as a DisplayPort output source. It is known as DisplayPort Alternate Mode, and it doesn’t require any adapter. So, if you are among the ones who purchased the single port Macbook, then you should be thankful to that particular port.

Furthermore, DisplayPort can produce output for more than one monitors using a single port. Multiple monitors can be added either by daisy chaining or using a hub.

HDMI

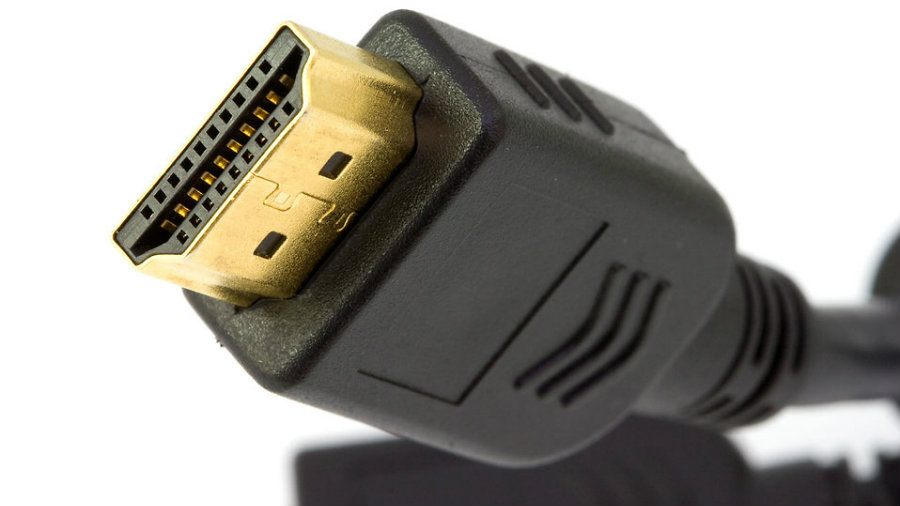
High-Definition Multimedia Interface is a proprietary video interface. You can find HDMI ports on almost every consumer electronics including televisions, monitors, DVRs, music systems. etc. HDMI 2.0 supports video output resolutions up to 4K (4096 x 20160p @ 60Hz). Future version i.e. HDMI 2.1 might arrive with support for an 8k resolution.

An HDMI hub or splitter can be used to deliver video output to multiple monitors. But daisy chaining in the case of HDMI is not an easy task in comparison to DisplayPort. Since, the release of HDMI 1.3, it has started to feature an Ethernet link (capable of transferring data at 100Mbps) in the cable itself. Another notable HDMI feature is ARC (Audio Return Channel) which enables transfer of audio from a source (television etc) to a receiver (for instance, connected speakers). Earlier, it was done using a sperate audio cable.

Talking about cables, they come in standard and high-speed cable options, both with and without an ethernet link. HDMI also implements content protection via HDCP. Moreover, a single remote control can be used to control various CEC (Consumer Electronics Control)-enabled devices connected over HDMI.

Similar to DisplayPort, an Alternate Mode using Type-C USB can be used to connect an HDMI-compliant device to a receiving device.

Thunderbolt

It’s an Intel-designed multipurpose interface which is intended for video output as well as connecting storage devices. Other than display, you can find a number of hard drives and SSDs using Thunderbolt port for connection. Thunderbolt isn’t present on many devices as it has been in existence since the last five years only. Apple was quick to put Thunderbolt ports on its Macbook Air and Pro laptops.

Earlier versions of Thunderbolt (1 & 2) interface utilized the mini DisplayPort connector. In the case of Thunderbolt 3, USB Type-C is used as the connector.

Thunderbolt 3 supports a maximum theoretical bandwidth of 40Gbit/s, capable of pushing video streams on two 4K displays at the same time. A single Thunderbolt port can connect up to 6 devices via daisy-chaining or a hub. By using the Type-C connector, it can also leverage the USB Power Delivery feature which can be used to charge a connected device using up to 100 watts of power.

MHL

Mobile High-Definition Link is an interface created for portable devices including mobile phones. MHL can be thought of as a spin-off version of HDMI. It was first proposed by Silicon Image which also had a significant contribution in the development of HDMI.

The initial version of MHL was capable of delivering 1080p video output along with eight channel audio. It also had features like HDCP and could be used to control CEC-enabled devices.

MHL 3 introduced support for 4K 30fps videos along with HDCP 2.2 and improved 7.1 surround audio. On mobile devices, it uses the micro-USB 2.0 port to connect to a display device using an MHL to HDMI adapter.

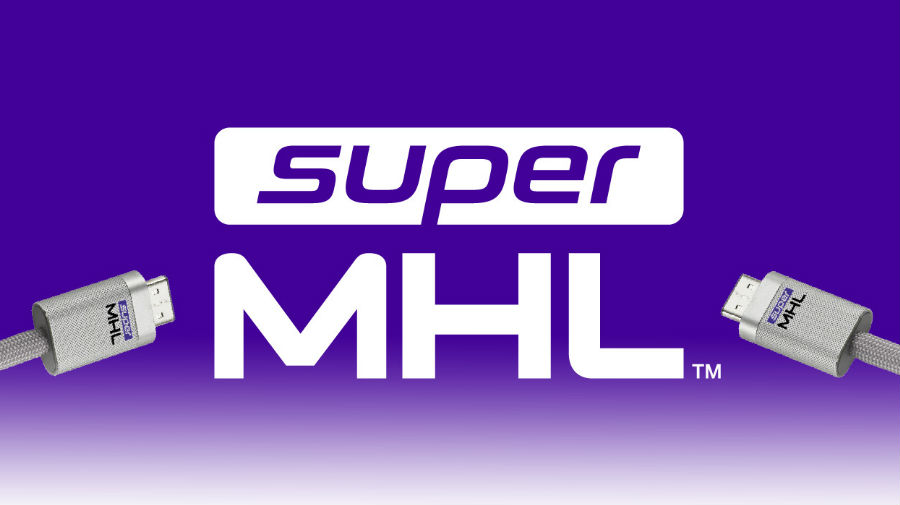
The latest version, superMHL, adds support for 8K videos at 120fps, Dolby Atmos, HDR, etc. It also brings a new reversible superMHL connector into the picture. Also, you can connect multiple displays to a single superMHL port. Just like HDMI, DisplayPort, and Thunderbolt, there is an MHL Alternate Mode for USB Type-C.

Winding Up

So, these were some of the interfaces designed to send audio/video content from one device to another. Clearly speaking, for VGA and DVI, most of their territory is acquired by newer alternatives, namely HDMI and DisplayPort.

If we try to compare DisplayPort and HDMI, DisplayPort may have an upper hand in the specifications department, but the reality is that HDMI has already captured most of the market. And now, makers of DisplayPort have started pushing their technology in the consumer space. Otherwise, DisplayPort has been mainly present on monitors and graphics cards.

Intel’s Thunderbolt is yet to make an impact. But thanks to the companies who have started giving Thunderbolt a place on their devices. Similarly, MHL has also existed for a small amount of time, but its utility in small devices, often compromising on space, has helped it speed on the success route.

For the time being, you can stick to HDMI for most of the time. But MHL is also touting itself as a promising technology for the future. And so is the case of DisplayPort. Intel Thunderbolt is posing itself as a one-stop solution for your various connection needs. Above all, a sense of relief is the implementation of USB Type-C for these different interfaces, which can also eliminate the requirement of different ports on a single device.

How to Erase Your Web Accounts in One Click

http://www.makeuseof.com/tag/how-to-erase-your-web-accounts-in-one-click/

How to Access Blocked Websites

Here are some ways to access your favourite  blocked website

1. Become Anonymous: Use Proxy Websites

Very often, in a professional environment, the employers draw certain boundaries, restricting your the access to some particular websites. At times, you need a way to access the blocked websites and in those situations, proxy websites act as a rescue method.

On the web, there are hundreds of proxy websites that make your web experience ‘unrestricted’. A proxy website becomes a moderator between the user and server site. The proxy website camouflages the blocked site from the ISPs and allows you to access blocked websites. To get a proxy website for any blocked site, just perform the Google search.

Eg: Facebook Proxy Server. In case, Facebook is blocked in your institution, or you can go to —

http://www.spysurfing.com/
https://www.hidemyass.com/
http://proxify.us/p/ and more…

2. Use VPN

VPN or Virtual Proxy Network allows you to connect your device to a secure connection to another network over the internet. VPN enables you to access blocked websites from your home network and puts your IP address in a land far away. You can also download the apps or open the sites blocked in your country.

VPN acts as a tunnel that converts your data into garbage value that’s difficult for anyone to sniff and recognize. There are tons of free/cheap VPN services that one can use and enjoy an uninterrupted internet experience.

If you are into exploring ways to enhance your computer security, you can also go for the deadly combination of TOR and VPN.

Check out our how to set-up VPN on Android devices without the need of any software. You can also read our detailed article on what is VPN and how it works.

3. Use IP Rather Than URL

The blocked website sometimes are stored as a list of URLs and using IP of the website might work in few of the cases. To get the IP address for any website, you do a ping domain.com command in Command Prompt. Using IP is a simple way to access blocked websites in your region. However, if the website had hidden its IP too, then it won’t open with this method.

All you need to do is run CMD on your computer. Now type “ping www.websitename.com” and press Enter. This will promptly return the IP address. Now enter this IP address in your web browser’s address bar and hit Enter.

4. Change Network Proxy In Browsers

Your college or institute might be having more than one proxy for its network. So, it happens that some websites are restricted on one proxy, but accessible in another. So, you can give a try to proxy surfing to access blocked websites in your college.

Disabling the network proxy settings in our web browsers isn’t a tough task. You just need to find the connections/network option in the settings of your web browser. There, you can select the no proxy option or use another one that’s providing unrestricted browsing at your institution.

5. Use Google Translate

Institutes or even countries sometimes don’t ban Google Translate. So, you can bypass the restriction by converting the blocked website into some other language that you may know. Try Google Translate and see for yourself. It is yet another simple way to access blocked websites.

You can also use Microsoft’s Bing translation service to unblock a banned website.

6. Bypass via Extensions

If the websites that are blocked by your institute or office are dynamic in nature such as Facebook or YouTube, then you should give a try to these extensions. Hola and ProxMate are some extensions that you can use to access blocked websites.

7. URL recasting

There are instances when a particular website is hosted in VPN and it doesn’t have a verified SSL installed. For such websites, you can simply go to the address bar of your web browser and try typing https://www.url.com, instead of accessing www.url.com or http://www.url.com. This change might display a security notice. Press on the Proceed Anyway option and visit the website.

8. Replace your DNS Server

We’ve already discussed this method under a separate topic named DNS Hack. You can simply use this method and bypass the blockade. This method generally involves using Google DNS or OpenDNS for accessing the internet.Here are the detailed steps on the same.

9. Go to Internet Archive — Wayback Machine

Wayback Machine is an interesting service that stores a copy of most of all website on the internet. It saves multiple versions of a website and you can use it to access the past versions of a website. The users can also use it to browse the blocked content online.

10. Use RSS Feed

RSS readers are useful for getting the fresh content and reading them with ease. You can grab the RSS feed of the blocked website and add it to your reader. Just in case that website doesn’t have an RSS feed, there are some useful online services to create the feed.

These are some of the most effective and easy to use methods to circumvent the censorship that has been put on your favorite websites. 

Tuesday 20 December 2016

Why Is Google Trying To Murder HTTP Connection Used By Websites

Modern times have witnessed a more sophisticated way of stealing data and stalking a person on the internet. The HTTP connection used by many websites is enough to lure malevolent minds to fulfill their intentions. Google is determined to demote the adoption of HTTP connection by websites.

The reason behind this objective is that the HTTP connection is not secure. What does that mean? If a website uses an HTTP connection, the passwords and credit card details you type there are sent in plain text over the network making it possible for any middleman to read all of it. And it is not only about the credit card numbers, a website using an HTTP connection can be modified by a person before it reaches your computer.

Another matter of concern is that people don’t give a second thought while accessing a website that’s not secure. The security indicators placed in web browsers are left unnoticed. Hence, the situation becomes more alarming.

Google wants the websites to shift to the HTTPS connection which uses SSL/TLS encryption to send data. So, when you type your credit card numbers they are converted into random-looking characters before being sent over the network.

“Beginning in January 2017 (Chrome 56), we’ll mark HTTP sites that transmit passwords or credit cards as non-secure, as part of a long-term plan to mark all HTTP sites as non-secure,” writes Emily Schechter, Google Security Team.

Schechter notes that a significant number of websites have transitioned to HTTPS and the number is increasing. “We recently hit a milestone with more than half of Chrome desktop page loads now served over HTTPS,” she writes.

In the coming months, Google will extensively encourage the frequency of “not secure” warning label on HTTP web pages in Google Chrome. Initially, HTTP warnings would be displayed in incognito mode and for all the web pages after some time.

HTTPS has many advantages over the HTTP connection and it helps in protecting your confidential information. Google is not alone acting to boost the adoption of HTTPS. A few months ago, the website hosting platform WordPress turned on HTTPS for all of its websites for free. Check out how an HTTPS page loads faster than an HTTP page.

How To Download YouTube Videos Using VLC Media Player

VLC is one of the most popular media players around. This free and open source media player became popular a long time ago as it was one of the first ones that “played anything”. Its simple UI can disguise the new users who might consider it less advanced. Few people know that VLC media player packs a wide range of features.

In our previous article, we’ve already told you how to convert a media file to any different format using VLC. In this article, I’m going to tell you how to download videos from YouTube using your favorite VLC media player.

Steps to download YouTube videos using VLC?

The method to download YouTube videos using VLC media player is very simple. Here are the steps that you need to follow to complete this task:

The first step involves opening some YouTube video and copying its URL from your web browser’s address bar. Here, I opened the Fossbytes YouTube channel and looked for the how to make Chrome faster tutorial. After that, I simply copied the path of the video from the address bar.Now you need to open VLC media player on your computer. I’ve written this tutorial using Windows 10. So, the appearance and placement of different options might differ on your Mac or Linux PC.In VLC, find the Open Capture Device option and click on it. It should open a new window.Now click on the Network tab and paste the copied URL in the empty field that’s titled Please enter a network URL. Now click Play button.This should soon start playing the YouTube video in your VLC media player. You can use the media controls in VLC just like the YouTube controls and use them to play, pause, or stop the playback.Now, in Tools option, click on Codec informationIt’ll open the Current Media Information window that’ll show codec information. There’ll be a link under Location. It’s basically the download link and you need to copy it.Now you need to open your web browser and paste the copied download link in the address bar and hit Enter. This would either start the video playback in your web browser or directly show you the download dialog. Simply click on the Savebutton to grab the video.Here’s the downloaded video in all its glory: