Wednesday 28 December 2016

How To Set-up VPN on Android Devices (No Software Needed)

With hackers and in fact sometimes our own governments lurking around, looking for just one opportunity to steal your data, you might want to give serious reconsideration before connecting. Somehow the idea of my bank credentials and personal information resting in someone else’s hands doesn’t seem to be very enthralling to me.

So how to overcome this problem? Simple just configure a Virtual Private Network (VPN).


A VPN would allow you to connect your device up to a secure connection to another network over the internet. In fact you can use it to access your home/company network while you are away, download apps which are not available in your country or simply keep your browsing and data secure over the public network.

So here is how to go about setting a VPN on your Android device:

Step 1. Go to Menu > Settings

Step 2. Now Click on More

Step 3. Now click on VPN and a screen like this one would open up:

Step 4. Now tap on the ‘+’ button at the right corner of the screen:

Step 5. Here enter a Name for the VPN connection, select the type of VPN server you are connecting to and enter the VPN server’s address and then click save.

Step 6. Now just tap on the created VPN to connect. You will be prompted to enter a username and password. After entering which you can connect to the VPN.

Once you are connected you will see a Key Icon / “VPN activated” notification in the notification drawer. In case you want to disconnect, simply tap on the notification and tap Disconnect.

Bonus Tip: In case you want to ensure that your data is always sent over a VPN, for instance while using a public Wi-Fi network all you need to do is this:

Connect to a VPN, save your account information and then click on the three dots icon at the corner of the screen. After that click on the ‘Always-On VPN’ icon to access this feature.

Note: I would advise readers to change their Screen Lock over from ‘Slide’ to ‘Pin’ or ‘Password’ otherwise they might get this error:

Also, sometimes you might be prompted with this:

Be careful because randomly entering passwords may cause your credential storage to be erased.

Now there is absolutely no need to freak out. Here is where our first tip would come in handy, just simply change your PIN and the question will go away as the credentials would have been forced to be updated.

Monday 26 December 2016

Switch Vs Router: Differences And Comparison Of Their Working Functionalities

Switches are very popular as a layer two device whereas a router is very famous for being a layer three device. So, what is that something special that makes router the most popular layer three device? We will take a look at all the differences and functional aspects of a switch and a router

Let’s take a look:

Switch vs Router — Comparison and differences

Switch’s properties:

Works at the Data link layer of the OSI layerUses ‘filter and forwarding’ when it receives a data packet in form of a frameA virtual LAN can be created using a Switch which inside the same LAN separates the LANs and make them virtual to each otherUsually comes with 24 to 48 portsTransmits Frames (layer 2 packets) and Layer 3 packets of the OSI modelUses its software for admin access and other configurationsHas its own memory for memorizing the devices connected over to the networkCan learn the MAC addresses and stores those addressed in a CAM (Content Addressable Memories)Supports Half as well as full duplex transmission modeA hub has only one broadcast domainCan support Spanning tree protocolNo packet collisions occur commonly inside a SwitchNo dynamic sharing of the bandwidth

Router’s properties:

Connects more than two networks unlike a SwitchWorks as a traffic police to direct a data packetCan be used for LAN, MAN, and WANIts packet is called a packet unlike a frame at layer two and electrical signal at layer oneIt works at layer three or also known as network layer of the OSI layerIt usually has 2-4-8 portsIt also stored Ip addresses in a table called Routing table and from there, it decides where to send the data packetIn router, every port has its own broadcast domainDynamic bandwidth sharingFaster processing than a switchCan perform Network Address Translations (NAT)

Working differences — Switch vs router

Before you proceed to further reading, have a look at the basic concepts of the different networking devices and hardware types — hub, switch, router, modem, bridge, repeater.

Let’s say around fifty computers are connected in a local area network. In the network, there is also a common resource from where computers can download data locally. So, this network forms a kind of a private network. However, when one of the computers would want to get some data from online sites like Facebook or Google, they will have to go to the internet and fetch the data and that makes a public network

So, when a computer wants to access a public network, it sends a data packet to the Switch which is the next immediate device in terms of data transmission. The switch opens up the packet and looks for the destination where the request packet wants to go.

The packet is directed for the public internet or world wide internet and Switch has no idea about it. So, Switch forwards this packet to the router — ‘The default gateway’. A router works as a gateway that is more like it is a door to the outside world and gets the data that a particular computer wants.

However, inside the campus, all the computers are a part of the private network which is not known to the outside world. So, it tweaks the private packet into the public packet and vice versa. This is called NATting which we will cover in the later topics.

What Is HTTP/2 And How It Works

HTTP 1.1 was a major move from HTTP 1.0 as it allowed persisted connections (more than one request/response on the same HTTP connection), improved caching, new status code, Enhanced compression support, OPTION method for Cross Origin Resource Sharing in web application and much more.

HTTP/1.1 has served the Web well for more than fifteen years, but its age is starting to show. Loading a Web page is more resource intensive than ever, and loading all of those assets efficiently is difficult because HTTP practically only allows one outstanding request per TCP connection.

Because of which, many TCP connections are created to issue parallel requests. And since there isn’t any limit on this; too many connections are used most of the times which leads to TCP congestion and unfair resource usage by browsers. It also means lots of duplicate data being transferred “on the wire”.

If too many requests are made, it hurts performance. This has led the industry to a place where it’s considered Best Practice to do things like spriting, data: inlining, domain sharding and concatenation. These hacks are indications of underlying problems in the protocol itself, and cause a number of problems on their own when used.

HTTP/2, on the other hand, enables a more efficient use of network resources and a reduced perception of latency by introducing header field compression and allowing multiple concurrent exchanges on the same connection. It also introduces unsolicited push of representations from servers to clients. This specification is an alternative to, but does not obsolete, the HTTP/1.1 message syntax. HTTP’s existing semantics remains unchanged.

At a high level, HTTP/2:

is binary, instead of textualis fully multiplexed, instead of ordered and blockingcan, therefore, use one connection for parallelismuses header compression to reduce overheadallows servers to “push” responses proactively into client caches

Wednesday 21 December 2016

Difference Between HDMI, VGA, DisplayPort, DVI, Thunderbolt, And MHL

If you want to connect your laptop to your TV or monitor, the most common thing to go for is HDMI. However, there are other cable options like DisplayPort, DVI, Thunderbolt, and VGA which are in existence since almost three decades.

All these different interfaces have been designed to carry video signals (and audio signals) from one device to another. So, what’s the thing which sets them apart? If you’re thinking it’s the video quality, then you might be correct only in the case of VGA. As for other connection interfaces, the video quality is almost the same.

VGA

It stands for Video Graphics Array and it’s probably the oldest display connector which can still be seen on a number of devices. I have a VGA port on my old Dell Inspiron. But the VGA connector, for obvious reasons, has started to lose its place on various devices for more advanced technologies. HDMI is an alternative in most cases. For Apple, Intel’s Thunderbolt is the interface used to push video content out of their laptops to display device.

VGA was originally created in the year 1987 by IBM as a display hardware. But it is widely recognized by people as the 15-pin D-Sub connector on the desktop machines which comes with screws to lock the connector with the VGA port.

VGA can support a video resolution of 1080p (and higher), but that’s not the thing which can help it to compete against newer technologies. This is because VGA uses analog signals to carry video from source to the receiving device. And it contributes to a degraded picture quality, often visible when compared to other interfaces based on digital signals.

A separate audio connection is required if you want to throw videos using VGA cables as it lacks support for the same. The length of the VGA cable, in addition to the quality of the material, can affect the intensity of signal degradation. Moreover, a low-quality VGA cable may also suffer from signal crosstalk or ghosting, in which signals from other wires in the vicinity can introduce unwanted currents.

DVI
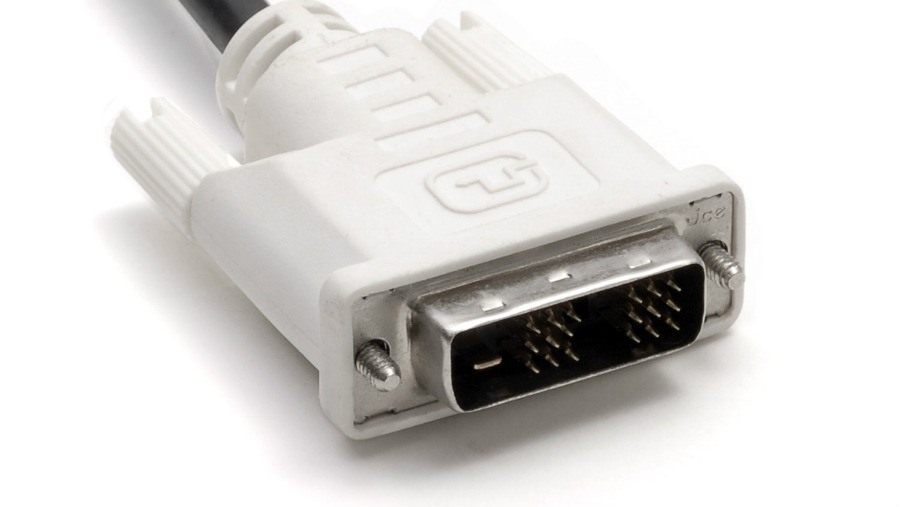
Digital Visual Interface is the one to follow the legacy of the VGA connector, but by taking the digital path. DVI, created by Digital Display Working Group, was introduced in the year 1999. The 29-pin connector shares visual traits with VGA connector and sports the screw locks.

DVI interface can push uncompressed digital video streams to a receiving device. In the case of digital signals, it can support WUXGA (1920x 1200) resolution @ 60 Hz via Single Link, and WQXGA (2560 x 1600) @ 60 Hz via Dual Link.

DVI also supports analog video output which makes it backward compatible (using an adapter) with the VGA interface. DVI might be relatively newer than VGA, it has mainly found its place on computer monitors. However, the technology is also on the verge of extinction.

DisplayPort
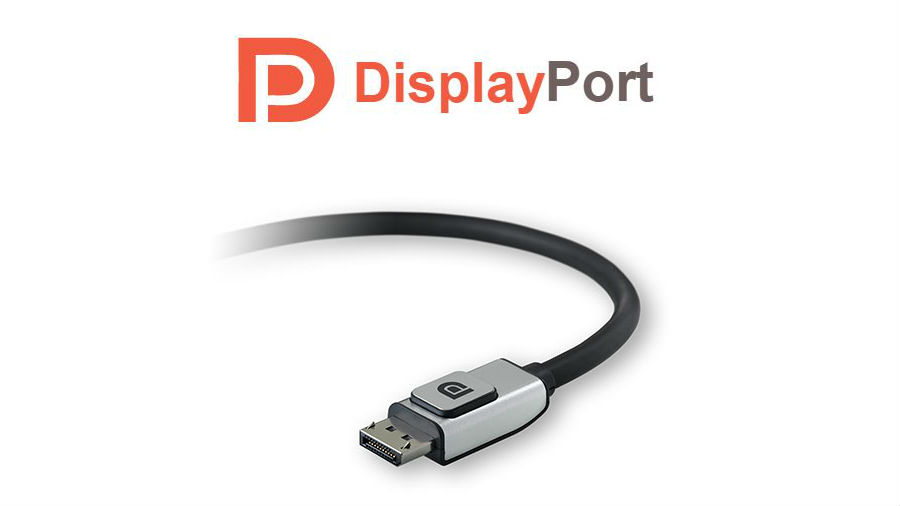
Launched in 2006, DisplayPort is a lot younger in comparison to VGA and DVI, and even HDMI. It is backward compatible with these interfaces. Just like DVI, it is primarily intended to be a computer connection interface.

According to the newest DisplayPort 1.4 specifications, it can support HDR and up to 8K video output on compatible devices. It also deploys a something known as Display Video Compression, which is claimed to deliver visually lossless video over a DisplayPort connection. Nvidia’s GeForce GTX 1080 is the world’s first graphics card to feature DisplayPort 1.4.

VESA, the creator of DisplayPort wants to put it as a considerable option for audio/video connection. They’re constantly adding support for various technologies to maintain pace with HDMI. Dynamic metadata support is available with DisplayPort 1.4 for HDR-compatible devices. It allows content creators to configure HDR for individual scenes.

An advantage of using a digital video connection is the implementation of DRM to prevent unauthorized playback of copyrighted content. Earlier versions of DisplayPort added support for DPCP (128-bit AES encryption), but the 56-bit HDCP was favored with the release of DisplayPort 1.1. Now DisplayPort 1.3 comes with HDCP 2.2.

DisplayPort comes with various other perks. A variant known as DisplayPort++ (or Dual-Mode) can be used to throw out HDMI and DVI-compatible video content using the same hardware. Also, VESA has figured out a method to use Type-C USB as a DisplayPort output source. It is known as DisplayPort Alternate Mode, and it doesn’t require any adapter. So, if you are among the ones who purchased the single port Macbook, then you should be thankful to that particular port.

Furthermore, DisplayPort can produce output for more than one monitors using a single port. Multiple monitors can be added either by daisy chaining or using a hub.

HDMI

High-Definition Multimedia Interface is a proprietary video interface. You can find HDMI ports on almost every consumer electronics including televisions, monitors, DVRs, music systems. etc. HDMI 2.0 supports video output resolutions up to 4K (4096 x 20160p @ 60Hz). Future version i.e. HDMI 2.1 might arrive with support for an 8k resolution.

An HDMI hub or splitter can be used to deliver video output to multiple monitors. But daisy chaining in the case of HDMI is not an easy task in comparison to DisplayPort. Since, the release of HDMI 1.3, it has started to feature an Ethernet link (capable of transferring data at 100Mbps) in the cable itself. Another notable HDMI feature is ARC (Audio Return Channel) which enables transfer of audio from a source (television etc) to a receiver (for instance, connected speakers). Earlier, it was done using a sperate audio cable.

Talking about cables, they come in standard and high-speed cable options, both with and without an ethernet link. HDMI also implements content protection via HDCP. Moreover, a single remote control can be used to control various CEC (Consumer Electronics Control)-enabled devices connected over HDMI.

Similar to DisplayPort, an Alternate Mode using Type-C USB can be used to connect an HDMI-compliant device to a receiving device.

Thunderbolt

It’s an Intel-designed multipurpose interface which is intended for video output as well as connecting storage devices. Other than display, you can find a number of hard drives and SSDs using Thunderbolt port for connection. Thunderbolt isn’t present on many devices as it has been in existence since the last five years only. Apple was quick to put Thunderbolt ports on its Macbook Air and Pro laptops.

Earlier versions of Thunderbolt (1 & 2) interface utilized the mini DisplayPort connector. In the case of Thunderbolt 3, USB Type-C is used as the connector.

Thunderbolt 3 supports a maximum theoretical bandwidth of 40Gbit/s, capable of pushing video streams on two 4K displays at the same time. A single Thunderbolt port can connect up to 6 devices via daisy-chaining or a hub. By using the Type-C connector, it can also leverage the USB Power Delivery feature which can be used to charge a connected device using up to 100 watts of power.

MHL
Mobile High-Definition Link is an interface created for portable devices including mobile phones. MHL can be thought of as a spin-off version of HDMI. It was first proposed by Silicon Image which also had a significant contribution in the development of HDMI.

The initial version of MHL was capable of delivering 1080p video output along with eight channel audio. It also had features like HDCP and could be used to control CEC-enabled devices.

MHL 3 introduced support for 4K 30fps videos along with HDCP 2.2 and improved 7.1 surround audio. On mobile devices, it uses the micro-USB 2.0 port to connect to a display device using an MHL to HDMI adapter.

The latest version, superMHL, adds support for 8K videos at 120fps, Dolby Atmos, HDR, etc. It also brings a new reversible superMHL connector into the picture. Also, you can connect multiple displays to a single superMHL port. Just like HDMI, DisplayPort, and Thunderbolt, there is an MHL Alternate Mode for USB Type-C.

Winding Up

So, these were some of the interfaces designed to send audio/video content from one device to another. Clearly speaking, for VGA and DVI, most of their territory is acquired by newer alternatives, namely HDMI and DisplayPort.

If we try to compare DisplayPort and HDMI, DisplayPort may have an upper hand in the specifications department, but the reality is that HDMI has already captured most of the market. And now, makers of DisplayPort have started pushing their technology in the consumer space. Otherwise, DisplayPort has been mainly present on monitors and graphics cards.

Intel’s Thunderbolt is yet to make an impact. But thanks to the companies who have started giving Thunderbolt a place on their devices. Similarly, MHL has also existed for a small amount of time, but its utility in small devices, often compromising on space, has helped it speed on the success route.

For the time being, you can stick to HDMI for most of the time. But MHL is also touting itself as a promising technology for the future. And so is the case of DisplayPort. Intel Thunderbolt is posing itself as a one-stop solution for your various connection needs. Above all, a sense of relief is the implementation of USB Type-C for these different interfaces, which can also eliminate the requirement of different ports on a single device.

How to Erase Your Web Accounts in One Click

http://www.makeuseof.com/tag/how-to-erase-your-web-accounts-in-one-click/

How to Access Blocked Websites

Here are some ways to access your favourite  blocked website

1. Become Anonymous: Use Proxy Websites

Very often, in a professional environment, the employers draw certain boundaries, restricting your the access to some particular websites. At times, you need a way to access the blocked websites and in those situations, proxy websites act as a rescue method.

On the web, there are hundreds of proxy websites that make your web experience ‘unrestricted’. A proxy website becomes a moderator between the user and server site. The proxy website camouflages the blocked site from the ISPs and allows you to access blocked websites. To get a proxy website for any blocked site, just perform the Google search.

Eg: Facebook Proxy Server. In case, Facebook is blocked in your institution, or you can go to —

http://www.spysurfing.com/
https://www.hidemyass.com/
http://proxify.us/p/ and more…

2. Use VPN

VPN or Virtual Proxy Network allows you to connect your device to a secure connection to another network over the internet. VPN enables you to access blocked websites from your home network and puts your IP address in a land far away. You can also download the apps or open the sites blocked in your country.

VPN acts as a tunnel that converts your data into garbage value that’s difficult for anyone to sniff and recognize. There are tons of free/cheap VPN services that one can use and enjoy an uninterrupted internet experience.

If you are into exploring ways to enhance your computer security, you can also go for the deadly combination of TOR and VPN.

Check out our how to set-up VPN on Android devices without the need of any software. You can also read our detailed article on what is VPN and how it works.

3. Use IP Rather Than URL

The blocked website sometimes are stored as a list of URLs and using IP of the website might work in few of the cases. To get the IP address for any website, you do a ping domain.com command in Command Prompt. Using IP is a simple way to access blocked websites in your region. However, if the website had hidden its IP too, then it won’t open with this method.

All you need to do is run CMD on your computer. Now type “ping www.websitename.com” and press Enter. This will promptly return the IP address. Now enter this IP address in your web browser’s address bar and hit Enter.

4. Change Network Proxy In Browsers

Your college or institute might be having more than one proxy for its network. So, it happens that some websites are restricted on one proxy, but accessible in another. So, you can give a try to proxy surfing to access blocked websites in your college.

Disabling the network proxy settings in our web browsers isn’t a tough task. You just need to find the connections/network option in the settings of your web browser. There, you can select the no proxy option or use another one that’s providing unrestricted browsing at your institution.

5. Use Google Translate

Institutes or even countries sometimes don’t ban Google Translate. So, you can bypass the restriction by converting the blocked website into some other language that you may know. Try Google Translate and see for yourself. It is yet another simple way to access blocked websites.

You can also use Microsoft’s Bing translation service to unblock a banned website.

6. Bypass via Extensions

If the websites that are blocked by your institute or office are dynamic in nature such as Facebook or YouTube, then you should give a try to these extensions. Hola and ProxMate are some extensions that you can use to access blocked websites.

7. URL recasting

There are instances when a particular website is hosted in VPN and it doesn’t have a verified SSL installed. For such websites, you can simply go to the address bar of your web browser and try typing https://www.url.com, instead of accessing www.url.com or http://www.url.com. This change might display a security notice. Press on the Proceed Anyway option and visit the website.

8. Replace your DNS Server

We’ve already discussed this method under a separate topic named DNS Hack. You can simply use this method and bypass the blockade. This method generally involves using Google DNS or OpenDNS for accessing the internet.Here are the detailed steps on the same.

9. Go to Internet Archive — Wayback Machine

Wayback Machine is an interesting service that stores a copy of most of all website on the internet. It saves multiple versions of a website and you can use it to access the past versions of a website. The users can also use it to browse the blocked content online.

10. Use RSS Feed

RSS readers are useful for getting the fresh content and reading them with ease. You can grab the RSS feed of the blocked website and add it to your reader. Just in case that website doesn’t have an RSS feed, there are some useful online services to create the feed.

These are some of the most effective and easy to use methods to circumvent the censorship that has been put on your favorite websites. 

Tuesday 20 December 2016

Why Is Google Trying To Murder HTTP Connection Used By Websites

Modern times have witnessed a more sophisticated way of stealing data and stalking a person on the internet. The HTTP connection used by many websites is enough to lure malevolent minds to fulfill their intentions. Google is determined to demote the adoption of HTTP connection by websites.

The reason behind this objective is that the HTTP connection is not secure. What does that mean? If a website uses an HTTP connection, the passwords and credit card details you type there are sent in plain text over the network making it possible for any middleman to read all of it. And it is not only about the credit card numbers, a website using an HTTP connection can be modified by a person before it reaches your computer.

Another matter of concern is that people don’t give a second thought while accessing a website that’s not secure. The security indicators placed in web browsers are left unnoticed. Hence, the situation becomes more alarming.

Google wants the websites to shift to the HTTPS connection which uses SSL/TLS encryption to send data. So, when you type your credit card numbers they are converted into random-looking characters before being sent over the network.

“Beginning in January 2017 (Chrome 56), we’ll mark HTTP sites that transmit passwords or credit cards as non-secure, as part of a long-term plan to mark all HTTP sites as non-secure,” writes Emily Schechter, Google Security Team.

Schechter notes that a significant number of websites have transitioned to HTTPS and the number is increasing. “We recently hit a milestone with more than half of Chrome desktop page loads now served over HTTPS,” she writes.

In the coming months, Google will extensively encourage the frequency of “not secure” warning label on HTTP web pages in Google Chrome. Initially, HTTP warnings would be displayed in incognito mode and for all the web pages after some time.

HTTPS has many advantages over the HTTP connection and it helps in protecting your confidential information. Google is not alone acting to boost the adoption of HTTPS. A few months ago, the website hosting platform WordPress turned on HTTPS for all of its websites for free. Check out how an HTTPS page loads faster than an HTTP page.

How To Download YouTube Videos Using VLC Media Player

VLC is one of the most popular media players around. This free and open source media player became popular a long time ago as it was one of the first ones that “played anything”. Its simple UI can disguise the new users who might consider it less advanced. Few people know that VLC media player packs a wide range of features.

In our previous article, we’ve already told you how to convert a media file to any different format using VLC. In this article, I’m going to tell you how to download videos from YouTube using your favorite VLC media player.

Steps to download YouTube videos using VLC?

The method to download YouTube videos using VLC media player is very simple. Here are the steps that you need to follow to complete this task:

The first step involves opening some YouTube video and copying its URL from your web browser’s address bar. Here, I opened the Fossbytes YouTube channel and looked for the how to make Chrome faster tutorial. After that, I simply copied the path of the video from the address bar.Now you need to open VLC media player on your computer. I’ve written this tutorial using Windows 10. So, the appearance and placement of different options might differ on your Mac or Linux PC.In VLC, find the Open Capture Device option and click on it. It should open a new window.Now click on the Network tab and paste the copied URL in the empty field that’s titled Please enter a network URL. Now click Play button.This should soon start playing the YouTube video in your VLC media player. You can use the media controls in VLC just like the YouTube controls and use them to play, pause, or stop the playback.Now, in Tools option, click on Codec informationIt’ll open the Current Media Information window that’ll show codec information. There’ll be a link under Location. It’s basically the download link and you need to copy it.Now you need to open your web browser and paste the copied download link in the address bar and hit Enter. This would either start the video playback in your web browser or directly show you the download dialog. Simply click on the Savebutton to grab the video.Here’s the downloaded video in all its glory:

Saturday 17 September 2016

How to Fix Windows 10 Slow Performance Issue and Increase Overall System Speed


windows-10-slow-performance-issue-fixShort Bytes: Many Windows users are facing Windows 10 slow performance issue in Windows 10. This appears in the form of input lags and could be fixed by tweaking some Page File settings in Windows 10. So, how to fix this slow performance issue in Windows 10 to boost system speed? Here is the answer.
After the official launch of Windows 10, millions of PC users upgraded their PCs to Windows 10 by availing the free upgrade offer from Microsoft. If you haven’t got the upgrade, here’s a simple way to get Windows 10 upgrade right now. However, several desktop users have reported Windows 10 slow performance issue on Microsoft forums and Reddit after upgrading their systems.
There are some definite issues with the Windows 10 OS as the number of people facing slow performance issue in Windows 10 is very large. This sluggish performance usually appears in the form of input lags. For example: After clicking the Start Menu, it takes about 2-3 seconds to appear or taking the same time to refresh your desktop, Complaining this Windows 10 slow performance issue, many users have downgraded to the previous versions of Windows OS.
According to a user at the Microsoft Community forums, Windows 10 slow performance issue could be fixed by tweaking the Page File settings in Windows 10 that affects and improves the overall system performance. If you’re facing the slow performance issue in Windows 10, you can try to speed up the OS by changing the default settings for Page File control.

How to Fix Windows 10 Slow Performance Issue and Boost your System Speed?

If you are irritated with slow performance issue in Windows 10, we advise you to follow this small guide to speed up your Windows 10 OS on you computer. You need to change the default settings for the Page File control in Windows 10 from System Managed to manual format. Here you can change the page file memory’s file and maximum size- based upon the RAM on your PC.

How to fix Windows 10 Slow performance:

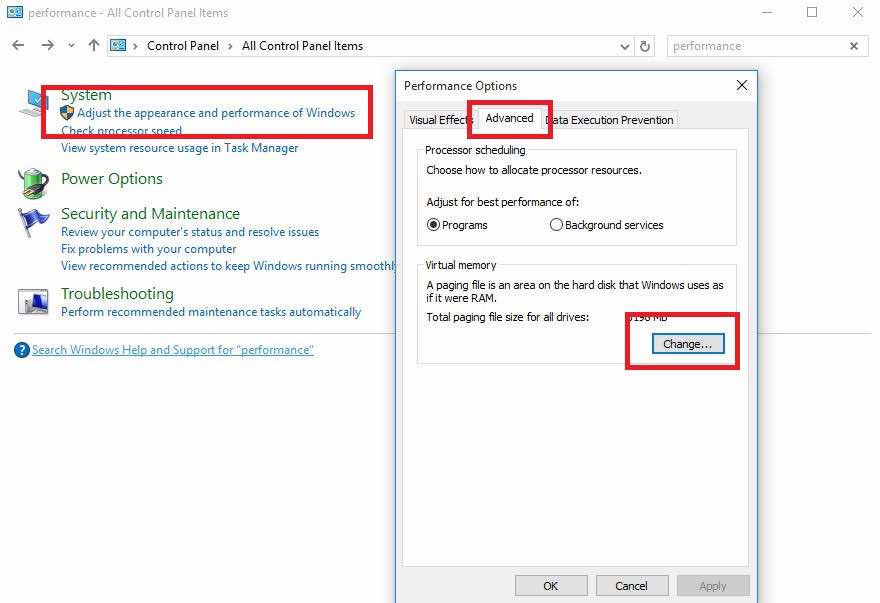
  •  Open Start Menu and find the Control Panel. Click on it.
  • Here in the Control Panel, go to the Search field at the top-right of the window and type Performance. Now hit Enter.
  • Now find Adjust the appearance and performance of Windows.
  • Go to the Advanced tab and click on Change in the Virtual Memory section.
windows-10-slow-performance-issue
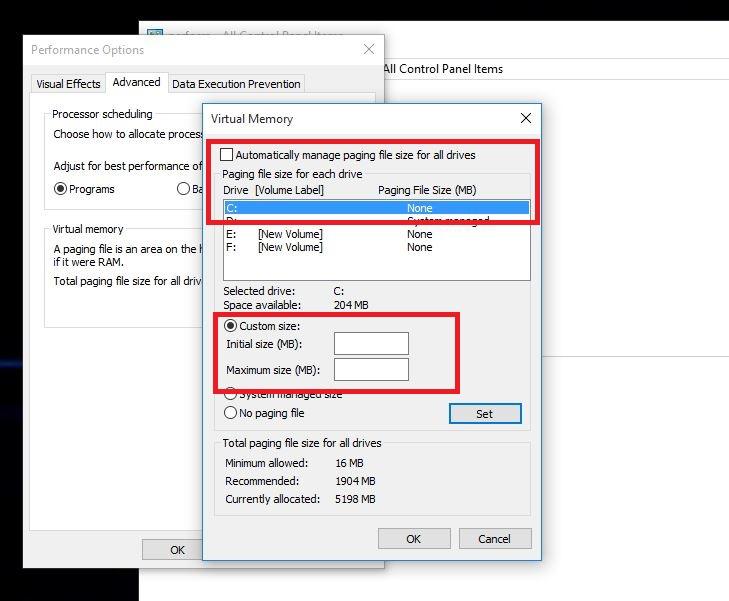
  • Now untick the option “Automatically manage paging file size for all drives.”
  • Select the default C: drive where Windows 10 is installed and then choose Custom Size. Then change Initial Size and Maximum Size to the recommended values by Windows (given below).
windows-10-slow-performance-issue-
  • Now click Set and then hit OK to save the settings.
  • Reboot the computer for the changes to take effect and fix the slow performance issue in Windows 10.
After your PC boots up, you should experience better Windows 10 performance. If you found this way to boost your Windows 10 system speed helpful – or you know any other method – feel free to mention it in the comments below.

Teardrop Attack: What Is It And How Does It Work?

WHAT IS A TEARDROP ATTACKTeardrop attack is a type of Denial of Service (DoS) attack which exploits the fragment offset field in the IP header to produce buggy fragments which are then delivered to the target machine. Unable to rearrange the fragments, the victim keeps on accumulating the fragments until it crashes.
As the name suggests, the Teardrop Attack works gradually by sending the fragmented packets to a target machine. It’s a type of a denial-of-service (DoS) attack which overwhelms the target machine with the incomplete data so that the victim crashes down.
In Teardrop Attack, fragmented packets that are sent in the to the target machine, are buggy in nature and the victim’s machine is unable to reassemble those packets due to the bug in the TCP/IP fragmentation.
In this way, the packets keep on getting accumulated over the victim’s machine and finally due to the buffer overflow, the target machine crashes down.

How Teardrop Attack works?

Here, I am taking a reference from the Juniper’s technical publication to illustrate how does it work —
Teardrop attack and IP header
As you can see in the above figure of IP header, which operates at the network layer, there is a field called fragment offset field.

Teardrop Attack and Fragment Offset:

Understand it like this — When a large amount of data is sent across the internet, the data is broken into the smaller fragments. Each of these fragments is assigned a number. When they reach the receiving end, these fragments are rearranged to reproduce the original data or message.
To identify the sequencing of the fragments, the fragment offset field holds the necessary information using which the target machine rearranges the sequence.
However, in the Teardrop Attack, the fragment offset field is made buggy by the hacker so the victim’s machine is unable to find the relative fragments.
So, as the name suggests, the buggy packets keep on accumulating at the victim’s side like teardrops and ultimately it leads to the machine crash.
However, modern networking devices can detect this discrepancy in a fragmented packet. Once they detect the problem, they simply drop the packet.

Saturday 30 July 2016

Top 5 IT Security Certifications To Enhance Your Career

While not having an IT security
certification doesn’t disqualify you from getting a job offer or promotion, but prospective employers looking for industry-
leading credentials look at it as one
measure of qualifications and commitment to quality.

As the market for information security talent heats up and the skills shortage continues, infosec experts who have the right combination of credentials
and experience are in remarkably high demand.
“A certification today is like a college degree,” says Grady Summers, America’s leader for information security program
management services at Ernst & Young.“You may not hire a candidate just because they have one, but it is something that you come to expect in this field.”
“There is no replacement for real-world experience,” Summers says. “However, certifications are important and have become de facto minimum criteria when screening resumes.”

Here is a list of top five security certifications, which are based on
review of job boards and interviews with IT security recruiters and employers:

Certified Ethical Hacker (CEH)

Certified Ethical Hacker (CEH) is gaining popularity as organizations concentrate on securing their IT infrastructure and networks from internal and external attacks. Some employers aggressively look
to hire candidates with CEH validation for hands-on security operations and intelligence activities.

CEH is a comprehensive Ethical Hacking and Information Systems Security Auditing program offered by EC-Council, suitable for
candidates who want to acquaint
themselves with the latest security threats,advanced attack vectors, and practical real time demonstrations of the latest hacking techniques, tools, tricks, methodologies, and security measures.

The goal of the CEH is to certify security practitioners in the methodology of ethical hacking. This vendor-neutral certification
covers the standards and language involved in exploiting system vulnerabilities, weaknesses and countermeasures. Basically, CEH shows candidates how the attacks are committed. It also makes efforts to define the legal role of ethical hacking in enterprise organizations.

Global Information Assurance Certification (GIAC)

Global Information Assurance Certification (GIAC) is the leading provider and developer of Cyber Security Certifications,globally recognized by government, military
and industry leaders. As a result, its demand is rising in specific disciplines such as security operations, digital forensics, incident handling, intrusion
detection, and application software
security.

This certification is designed for
candidates who want to demonstrate skills in IT systems roles with respect to security
tasks. Ideal candidates for this certification possess an understanding of information
security beyond simple terminology and concepts.

“GIAC’s focus on open source tools and its aggressive in-depth training is very useful,” says Daryl Pfeil, CEO of Digital Forensics Solutions, a computer security and digital
forensics firm. She finds GIAC certified candidates highly skilled and talented to handle the dynamic demands of the real-
world job environment. Similarly, employers and recruiters are
gradually finding the GIAC credential as a requirement for hands-on technical positions.

Certified Information Security Manager (CISM)

Certified Information Security Manager (CISM) is significantly in demand as the profession concentrates on the business side of security. Offered by Information
Systems Audit and Control Association (ISACA), CISM addresses the connection
between business needs and IT security by concentrating on security organizational
issues and risk management.

This certification is for candidates who have an inclination towards organizational security and want to demonstrate the ability to create a relationship between an information security program and broader business goals and objectives.

Basically, CISM is perfect for IT security professionals looking to grow and build their career into mid-level and senior management positions. This certification ensures knowledge of information security, as well as development and management
of an information security program.

Certified Information Systems Security Professional (CISSP)

Certified Information Systems Security Professional (CISSP) is an independent information security certification governed by the International Information System
Security Certification Consortium, also known as (ISC)², the not-for-profit consortium that offers IT security certifications and training.
CISSP is viewed as the baseline standard for information security professions in government and industry. Companies have
started to require CISSP certification for their technical, mid-management and
senior management IT security positions.

This certification is designed for
candidates who are interested in the field of information security. The ideal candidates are those who are information assurance professionals and know how to
define the design, information system architecture, management and control that can guarantee the security of business environments.
The CISSP is widely popular within the IT security community, as it provides the basis of security knowledge. “We feel safe
hiring candidates carrying this validation,” says Ellis Belvins, division director at Robert Half International, a professional
staffing consultancy. The certification validates the security professionals’ high proficiency, principles and methodologies,
commitment and deeper understanding of security concepts.

Vendor Certifications

The increasing need for hands-on network engineers, along with social computing and web technology, has pushed network
security even further. Vendor certifications including Microsoft’s Certified Systems Engineer (MCSE) with focus on security,Cisco’s Certified Network Associate
Certification (CCNA), and Check Point’s Certified Security Expert (CCSE) top the list as organizations within government,
banking and healthcare that look to fill open positions including system administrators, network and architects.

Tuesday 12 July 2016

Become an Android Developer : Here is how you can create your first Android App

Follow this 7 step guide to create
your first Android App Android is no doubt a great platform for
users as well as developers.

Thanks to Android Studio and continuous support from Google. And in case you were thinking to begin creating Android apps but did not have much idea of the know-how, you can follow this article to get your doubts clarified.

Programming Language

Android apps are developed in Java. You do not need to be an expert, but you should be good in specific areas, e.g. you need to have good knowledge of AWT and Swing for developing a GUI for your app.
Getting easy with following topics before starting will make the development phase more enjoyable.
>> Event Handling.
>> Swing.
>> Constructors.
>> JDBC.
>> Classes, Objects and Methods.
>> Packages.
>> Abstraction.
>> Polymorphism.
>> Inheritance.
You’ll also need to learn basics
of the Extended Markup Language(XML).

Places to Learn From
You can Learn Basics of Java and Android Development from these websites.
1. TreeHouse
2. Tutorials Point
3. Udacity ( Android development for
beginners)
4.Youtube
5.EdX

Steps to get an app built

1. Ideation
First of all an idea is required to be worked on. You’ll need to have a clear view of what your app will be for and what it will do. A good idea will be to start small and gradually add sophistication. Don’t make it
so boring that you don’t want to make it but try to avoid any complex functions as far as possible. Ideally, the app will only require one ‘screen’ (activity) and will involve some simple interactions so that something happens when the user presses a button. Consider it a challenge to make something that’s genuinely useful with the minimum amount of code.

2. Choosing your IDE

The most common way to build Android apps is to use Android Studio and Java.
This is the official method recommended by Google and it will afford you a lot of flexibility while ensuring there’s plenty of support if things go wrong. This is also the
method you will need to know if you ever plan on becoming a professional developer.

There are numerous other options for your IDE and language too however. You may pick Unity and C++ for instance if you want
to make a game. Basic4Android is an IDE focused on rapid development that lets you code with BASIC rather than Java. There’s
even an IDE that runs on Android called AIDE.

3. Collecting Resources

Resources mean images and other
material you will use in your app. You can download numerous images and use them but be aware not to violate someone’s copyright.

4. Building the layout of your app in
IDE

Now you’re going to create your layout in Android Studio using the ‘designer’. This is a tool that lets you simply drag and drop the widgets (also called ‘views’) where you
want them on the page.

You’ll need to start a new project in Android Studio to do this but there will still be no coding necessary at this point (except maybe a little XML). To start a new project select File > New > New Project. Follow the steps
selecting a name for your project and for your activities and choose ‘Empty Activity’.

5. Writing the core code

Now comes the more challenging part – adding the code. You know the basics of Java and you have your widgets/views already in place.

Now you’re going to open the Java file for your main activity and
simply create some ‘onClick’ events to add code that will run only when users click a specific button or otherwise take a specificaction.

6. Implementing more complexity

By now though, you should have some of the basic functionality in place so that your app responds to button clicks (in one way or another) and perhaps stores some variables. Next is to add the more advanced
functionality that will be specific to your app. For example, you might want your app to play music when a button is clicked. Maybe you want to add some flashy animations. Or perhaps you need to know how to transition from one activity to the
other.

7. Final review and publishing

Now comes the last step. You’ll have to test your app for bugs and once everything is right you can get your app published on Google Play Store.

Saturday 28 May 2016

Free Phishing Simulators for hackers and security researchers

In our attempt to make this world free from cyber criminals, we have brought out different articles about hacking tools and apps. The attempt of putting such articles in public domain is to educate readers about the clear and present dangers about surfing online without taking necessary precautions. They are also meant to educate wannabe hackers about new tools, apps and techniques.

In continuation to our above, goal we bring this article on phishing tools. Phishing is the attempt to acquire sensitive information such as usernames, passwords, and credit card details (and sometimes, indirectly, money), often for malicious reasons, by masquerading as a trustworthy entity in an electronic communication.

So, if you are essentially looking for a free phishing simulator or tools for your company, you have only three options: (1) Simple tools that allows you to create a simple email message and send it to one or numerous recipients using a specified mail server, (2) Open-source phishing platforms, and (3) Demo versions of commercial products.

You can use this tools to test the cyber defences of your company, provide cyber security training to your employees and friends.

(1) SecurityIQ PhishSim

Developed by InfoSec Institute, one of the many first benefits of SecurityIQ PhishSim is that after filling out a short online form, you get access to all benefits of software-as-a-service (SaaS) without having to pay for anything. It has no installation, no scripts to modify, and no servers to configure. All you need to do is simply sign up for a free account and start phishing and educate yourself. But, there are limitations, which include limited number of learners, branding and other customization options. However, the important components, such as using multiple templates (with over 100 templates to select from) in one campaign, report delivery and exporting features, campaign scheduling options, and an interactive phishing awareness education module, are included in the free account that allows you to run numerous extremely effective phishing campaigns.

(2) Gophish

Gophish is a powerful, easy-to-use, open-source phishing toolkit meant to help pentesters and businesses conduct real-world phishing simulations. The installation process is as simple as downloading and extracting a ZIP folder, as it is supported by most operating systems. While the limited features are considerately applied, the interface is simple and intuitive. Users can be easily added either manually or via bulk CSV importing. Email templates are easy to create and modify, creating campaigns is a direct process, and reports are pleasing to look at and can be exported to CSV format with many levels of detail. However, the most important disadvantage is that there no campaign scheduling options and no awareness education components.

(3) LUCY

LUCY is a hassle-free download of the free (community) version of the platform. You can download LUCY as a Debian install script or a virtual appliance. All you need is your email address and name for the same. While the web interface is attractive and maybe a bit confusing, there are many other features to explore. Designed as a social engineering platform, LUCY goes beyond phishing. It has awareness element along with interactive modules and puzzles. However, the community version of LUCY has too many restrictions to be efficiently used in an enterprise environment. Some important features such as campaign scheduling options, exporting campaign stats, and performing file (attachment) attacks, are not available under community license.

(4) Simple Phishing Toolkit (sptoolkit)

Simple Phishing Toolkit is a super easy to install and use phishing framework built to help information security professionals find human vulnerabilities. It offers an opportunity to combine phishing tests with security awareness education, with a feature that (optionally) directs phished users to a landing page with an awareness education video. Additionally, there is a tracking feature for users who completed the training. Ironically, the sptoolkit project was abandoned back in 2013. While a new team is trying to infuse new life in it, the documentation currently is rare and distributed all over the internet, making it a difficult task to realistically apply in an enterprise environment.

(5) Phishing Frenzy

Designed as a penetration testing tool, this open-source Ruby on Rails application has many features that could make it an effective solution for internal phishing campaigns. Compared to other similar tools, one of the main advantages is that you can manage your phishing tests more effectively as you can include the scope of your engagement as well when you create a new phishing campaign. Another advantage of Phishing Frenzy is that it can generate statistics regarding the users in scope (i.e. how many clicked the link?) which is always essential for the clients who order this type of test and the penetration tester as this information can be included as well in the final report. The stats can be viewed and easily saved into a PDF or an XML file, which is perhaps the most important feature of Phishing Frenzy. However, Phishing Frenzy is a Linux-based application, whose installation should not to be handled by a beginner.

(6) King Phisher

King Phisher is an open source Phishing Campaign Toolkit from SecureState. It has several features, which includes the ability to run multiple campaigns concurrently, web cloning capabilities, geo location of phished users, etc. Templates for both messages and server pages are contained in a separate template repository. While the user interface is clean and simple, it’s installation and configuration is not that easy. King Phisher server is only supported on Linux, with additional installation and configuration steps needed based on flavor and existing configuration.

(7) SpeedPhish Framework (SPF)

Created by Adam Compton, this python tool has many features that let you to quickly configure and carry out effective phishing attacks, including data entry attack vector. A tech-savvy security professional will be able to run phishing campaigns against several targets and can have a lot of fun with SPF. However, it will still remain a pentesting tool having many outstanding features (such as email address gathering) that may be hardly have importance for someone who is carrying out internal phishing tests.

(8) Social-Engineer Toolkit (SET)

Created and written by the founder of TrustedSec, the Social-Engineer Toolkit (SET) is an open-source Python-driven tool aimed at penetration testing around Social-Engineering. It has no graphical user interface (GUI). SET is the standard for social-engineering penetration tests and supported heavily within the security community. For phishing, SET allows to send spear-phishing emails, running mass mailer campaigns along with some more advanced options, such as adding list of target emails from a file and flagging your message with high priority. While it is effective as a penetration testing tool, but it is very restricted as a phishing simulation solution and does not include any campaign management features or reporting.

(9) SpearPhisher BETA

Developed by TrustedSec, SpearPhisher is a tool that doesn’t try to cheat anyone other than its phishing targets. It says it correctly in the description: “A Simple Phishing Email Generation Tool.” With an emphasis on ‘simple.’ SpearPhisher is a Windows-based program with a direct GUI designed for non-technical users. It lets you to swiftly craft a phishing email with customized From Email, From Name, and Subject fields and includes a WYSIWYG HTML editor and an option to include one attachment. By adding email addresses to To, CC, and BCC fields, you can send the crafted email to many recipients. Since 2013, the program has been in Beta, and hence it is likely that there may not be any updates in the near future