Saturday, 23 May 2020
Inspiration
Saturday, 15 April 2017
How to Enable 'Undo Send' in Gmail

Gmail's "Undo Send" can help you avoid serious email blunders. Here's how to turn it on.
You have email regrets. Everyone does. Perhaps you knew it was a bad idea or a "reply all" disaster the second you hit Send. But that's life; you live, you learn.
Except if you have Gmail, that is. While Google can't exactly invent a time machine, its "Undo Send" feature within Gmail can recall a mistakenly sent message.
"Undo Send" was added to Gmail Labs eight years ago, but is now an official Gmail feature. If you have had this enabled via Labs for some time, no need to take any action. But if not, and you anticipate some email blunders in the future, here's how to set it up.
•Log into Gmail on the desktop.•Click the Gear icon on the top right of the screen.•Select Settings.•Under the General tab, scroll down to Undo Send.•Click "Enable Undo Send"•Click the drop-down menu and select whether you want the "Undo Send" option to appear for 5, 10, 20, or 30 seconds after you hit send.

•Select Save Changes at the bottom of the screen.•The next time you send a message and get the confirmation "Your message has been sent," an Undo button should appear next to it.
If you want to test out other experimental Gmail features (which may never be released), try out Labs by going to the Gear icon > Settings > Labs tab > Clicking the Enable button next to any options that look interesting > Save Changes at the bottom of the page.
Monday, 3 April 2017
Friday, 27 January 2017
What’s Inside My Computer — Different Components Of A Computer
What’s inside my computer? It is a common question that pops up in the head of almost every computer user who is in the process of getting comfy with his/her machine. The same thing also happened to me. And very few users are able to build the courage to unscrew their machine and see what’s inside their computer. I was one such person.
It was one day when I borrowed a friend’s screwdriver set to open my laptop, a Dell Inspiron N5010. Just like me, most of the people who actually build the nerves to open up their laptop don’t think much about the consequences of the experiment they are going to perform.
Chances are high that their innocent machine may never be able to power up after they somehow manage to tight the screws, satisfying their curiosity of knowing what’s inside their computer. I also ended up leaving one of the important parts unscrewed during the closing process. Thankfully, I am writing this article on the same Inspiron N5010 which was once a subject of my tech experiment. I did strip down my laptop several times, thereafter.
In this article, I have tried to put the best of my knowledge about the components of a computer and this is my answer to the question,
What’s Inside My Computer?
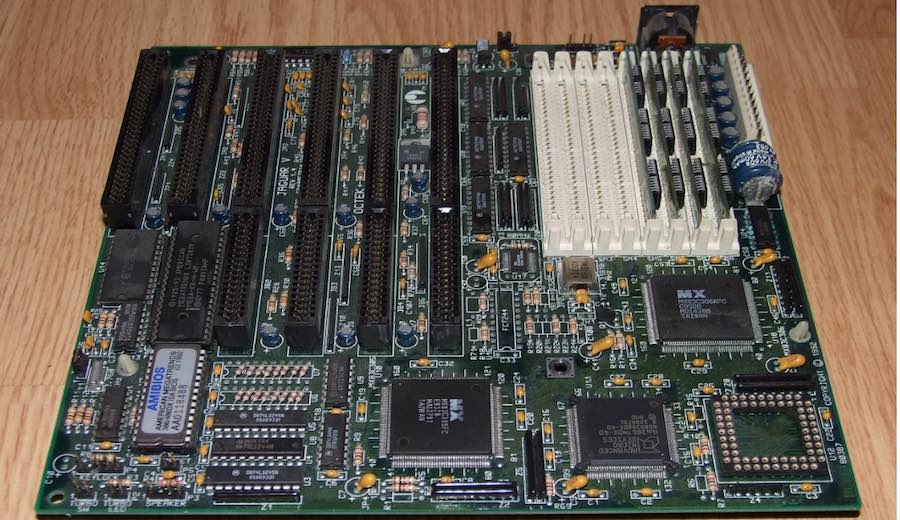
The basic building block of a computer, whether it’s a laptop or a desktop, is a green colored printed circuit board called Motherboard. All the other components are connected to it and use various circuits and interfaces to communicate with each other. For a desktop computer, you only have to open one screw in order to gain access to what is inside the computer. But for a laptop computer, it’s tedious and frightening job.
Motherboard houses various components like memory slots, sockets, chipset, clock generator, expansion slots, storage connectors, etc. I have already covered the components of a motherboard in one of my previous writings. You can read it by clicking the link below.
What Is A Motherboard? What Are The Different Components?
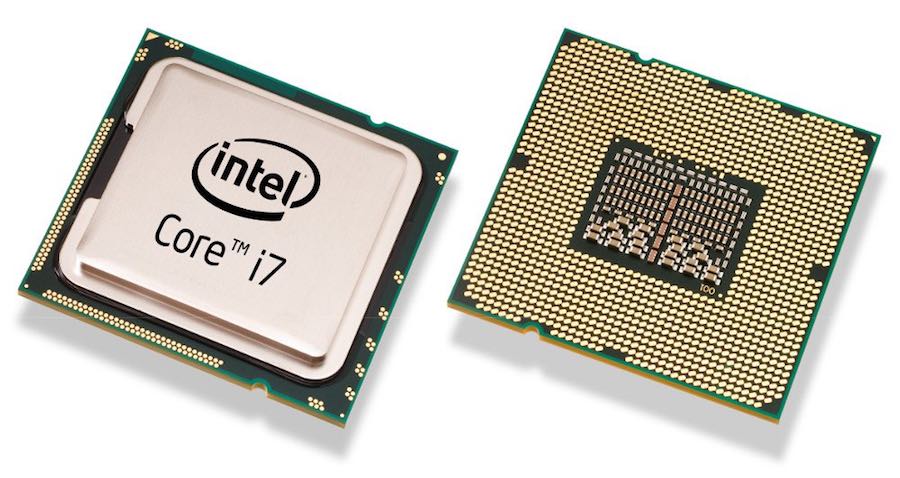
You might have heard it an uncountable number of times that a processor or a CPU (Central Processing Unit) is the brain of a computer. Often, in the case of desktops, people confuse the CPU with the cabinet. But it’s a small chip placed on the socket of the motherboard and is responsible for all the calculations and input/output operations to be done in order to process the data. Modern computers have small-sized CPU chips known as Microprocessors.
A microprocessor houses the two components of a processor, processing unit and the control unit, on a single small IC. Modern microprocessors come as single core or multi-core. A multi-core microprocessor such as the Intel Core i7, have more than one processing units (cores) present on a single chip.
The basic task a processor has to perform can be divided into three categories:
It gathers the necessary program data to be processed. For this, the data is first shifted from the hard drive to the RAM of the computer then to the CPU.The CPU then processes the data on the basis of some rules and regulations, known as Instruction Set, it already knows.Finally, the processed data is ready. It then follows the steps the programmer has included in the program. For example, the processed data can be displayed on the screen or saved to the hard drive.
Read More: Difference between 32-Bit Vs 64-Bit Windows OS
Cache:
It is a memory supplement used by the CPU while it’s busy with the processing jobs. Cache memory contains the data which is often required by a CPU like the program instructions. It is easier for the CPU access the cache memory first than going for the larger ones. Cache memory is way faster than RAMs and hence it’s costlier. So, the size of the cache memory is kept very limited.
The cache memory is present on the CPU chip itself.
Cache memory comes in levels like L1 cache, L2 cache, and L3 cache. The CPU first searches for the required data in L1, then L2, then L3, and L4 if it exists. Finally, if none of the cache memories are able to provide the required data, it will access the RAM. Cache memory is very vital to a computer. A computer with a faster processor and less cache will perform worse than a slower processor with more cache. But this doesn’t mean that a 20-year-old processor puffed with excess cache could outperform a present-day processor.
RAM:
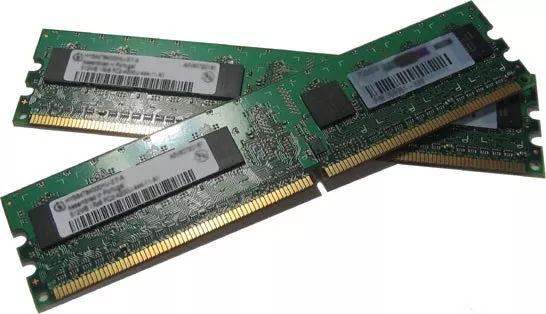
Random Access Memory is one of the vital parts of a computer. If you take out the RAM chip out of your computer, it won’t start. It is faster than the hard drives and is used to store program data which is currently used by the CPU. But RAM suffers from short -term memory loss. What does it mean? It holds data only when it receives power. Once you turn off your computer all the data will be lost. That’s the reason it can’t be used as a permanent storage solution in a computer.
The RAM chips we use in our laptop and desktops differ in size. The reason is to make the memory chip compact for the laptops. But they have the same functionality and powers. Dynamic RAM integrated circuits, known as Dual-Inline Memory Module (DIMM), are mounted on green colored PCB and then called as DIMM chips. Memory variants like DDR, DDR2, DDR3, DDR4, etc. differ in the number of pin counts they have.
Before DIMMs, SIMMs used to exist. The key difference between the two is the number of pin counts. SIMMs have half the number of pins than DIMMs. However, the number of pins will appear the same if you take a casual look on them. A keen observation would lead to a conclusion that the pins on either side of a SIMM are connected to each other which is not the case with DIMM.
Also, the SIMM supports a 32-bit data bus while DIMM supports 64-bit data bus. This allows the flow of more data in the case of DIMM. The modern 64-bit CPUs would require an installation of two SIMMs chips.A single DIMM would be sufficient for that. Hence, the SIMMs became obsolete with time.
Read More: 4GB, 8GB Or 16GB; How Much RAM Do You Need?
BIOS:
The Basic Input/Output System (BIOS) is responsible for starting your computer. When you press the power button, the BIOS comes into action. It first checks that all the components are connected are working fine. It then loads the operating system. It also behaves as a middle man between and the operating system and the hardware components of the computer.
BIOS is actually a firmware (software) which can be stored either on a non-volatile memory chip present on the motherboard. The chip is a flash memory chip or EEPROM on which the data can be rewritten but it stays intact when we cut the power, unlike the normal RAM. This facilitates easy upgrade of the BIOS firmware.
BIOS is specific for different computers. Like, a BIOS designed for a Dell computer won’t be supported by an HP computer. If you install a non-supported BIOS on a machine, it may lead to hardware failure. It is so specific that even if you install the BIOS of a different model of the same manufacturer, you might end up burning your motherboard.
UEFI (Unified Extensible Firmware Interface) can be called the future of the BIOS. It is more advanced and provides better security. However, most manufacturers still provide support for UEFI and BIOS with their machines as UEFI is not implemented across the world.
Storage Memory:

It is a large and permanent storage space which is used to keep all the data required by a computer like the operating system files, songs, videos, and third-party software files, etc. When needed, the data is transferred from the hard drive to the random access memory for being used by the CPU.
This memory can be a magnetic rotating hard disk drive (HDDs) or a Solid State Drive (SSD). Hard Drive is common than the newer SSDs as they are cheap but SSDs are way faster. These HDDs and HDDs connected to the computer through the SATA interface-based storage connectors present on the motherboard.
Read More: What Is SSD And How SSDs Work
Electronic Visual Display:
It is an output device connected to a computer which displays the desired graphics output produced by the graphics processing unit of the computer. Generally known as a monitor, a computer display can be an LCD (Liquid Crystal Display) based or LED (Light Emitting Diode) based. Earlier computer display monitors were based on Cathode Ray Tube (CRT) but these became obsolete as more compact and advanced LCD and LED panels gained popularity.
For desktop computers, the display unit remains separate than the rest of the computer components. Desktop computers are useful for long usage schedules. Having a separate monitor also makes the replacement process easier if something goes wrong with the display.
The computer can connect to the display via different connection modes like VGA, HDMI, DVI, DisplayPort, etc. Intel’s Thunderbolt offers video output as well as data transfer through the same connection interface for different devices.
For laptops and netbooks, the display unit is separate but attached to the chassis housing the computer components for the reason of making it compact. This adds to the mobility and ease offered to the user. These displays use a different type of video cable to connect to the motherboard. AIOs provide best of both worlds by providing the display and the computer components in the same body.
You might not know that the ‘Refresh’ option in Microsoft Windows actually concerns with the display not the CPU or memory of the computer. Read the following article to know more:
Read More: What Does The Refresh Option In Windows Actually Do?
Optical Disk Drive
These are used to read optical media like DVDs and Blu-Ray discs. To read the data written on a DVD or a Blu-ray disc, a pickup head is present inside. It comprises of a lens which a helps a laser beam to throw light on the written data in a current sequence. The reflected light is captured by photodiodes. Thus, the data is analyzed and processed to make it understandable to humans.
Desktops generally feature a tray-load type optical disk drives while the laptops feature a slot-load type optical disk drives. These optical disk drives are capable of reading and writing data to a supported media. External optical disk drives are also available which can connect to the USB port present on the computer.
Graphics Processing Unit

As the name indicates, a graphics card, or a GPU, or a visual processing unit (VPU) takes care of the graphics department of the computer. It processes the relevant data which is to be displayed on the monitor. GPUs can be integrated directly into the motherboard. They also come with separate graphics processors which can be connected to a computer using the PCI slot present on its motherboard.
The integrated graphics processors use the RAM installed on the computer while the discrete graphics cards come with their own RAM (known GDDR or video memory), a separate power supply, and cooling system. This makes them faster and more reliable than the integrated graphics processor. Modern graphics cards like the Nvidia Titan X come with 12 GB of video memory and some mighty ones like AMD Radeon Pro SSD include solid state drives to have a video memory up to 1000 GB.
Final Words
The coordination between the operations of these different components makes a computer perform tasks for us. All these components have shrunk in size over the years and will continue to shrink further in the coming future. The world’s first general-purpose computer was a US army pet project developed under the name “Project PX” at the University of Pennsylvania. Released on February 15, 1946, it later became famous as the ENIAC (Electronic Numerical Integrator And Computer). The 30 metric ton computer consumed 150 kW electricity. ENIAC went out of service in 1955.
Modern day computers are more powerful, energy efficient, and compact than their ancestors. But the computers like ENIAC have been the inspiration for these machines. We’ll continue to see more advancement the computer world.
Tuesday, 10 January 2017
5 Best Apps to do Programming on Android Platform
C4droid – C/C++ compiler & IDE

C4droid is a very popular and user-friendly C/C++ IDE and compiler for Android platform. You can write and run C and C++ programs directly on your phone. It is a paid app and I personally used it. It is really great application for C/C++ programmers. Some of its features are mentioned below.
Features
Create your own applications on android device and run them even without internet accessSource code editor with syntax highlighting, tabs, code completion, code formatting, file association and undo/redoEasily export and share your programs as APKs or native executables (for terminal apps)No root access is requiredFull ANSI C and ISO C99 support with TCC (Tiny C Compiler) + uClibcSupports Git integrationCustomize the GUI, choose where to place tabs and buttons, various themes are also supported.

CppDroid is another simple C/C++ IDE and compiler for android devices. It is focused on learning programming languages and libraries. I have also used this app and it is freely available. Lets take a look on some of its main features.
Features
code complete, real-time diagnostics (warnings and errors) and fixesfile and tutorial navigator (variables, methods, etc), static analysissmart syntax highlighting, auto indentation and auto pairing (configurable)compile and run C/C++ code (no root access required)works offline (no internet connection required), Dropbox support
Apart from this, it also provides so many tutorials, examples and projects that will help in learning C and C++ programming.
AIDE- IDE for Android Java C++

AIDE is an IDE for developing real Android apps directly on Android device. If you are an android or java developer then AIDE is a great app for you. It also allows C and C++ development. In short it is an all in one IDE which allows you to develop Android, Java, C and C++ projects on your mobile. AIDE also provide lessons that will help to learn Android app development and Java programming. Below I have mentioned some of its important features.
Features
Interactive lessons for Android, Java and Game developmentEdit, compile and run code with single click. No root access is required.Debug Android Java apps and Java Console appsReal-time error checking, Code RefactoringCode completion and syntax highlighting, Dropbox integration
If you love C# programming so much then C# To Go app will let you to do C# programming anywhere on your mobile. It is like having mini C# compiler in your pocket. C# To Go provides various features like code completion, syntax highlighting, etc. It is also a free app which can be downloaded from google play store freely.

QPython is a script engine that runs Python scripts and projects on android devices. It contains the Python interpreter, console, editor, and the SL4A Library for Android. It offers a great development kit which lets you easily develop Python projects and scripts on your phone.
Sunday, 8 January 2017
Here are some best free apps to get some knowledge of the hacking
If you are a beginner who wants to gain a toehold in demystifying world of hacking, this hacking tutorial apps is the best way for you as it offers knowhow including the easiest way to perform hacking and enabling the protection of your device.
This is one of most informative Android hacking tutorials that explain almost all hacking techniques and practical applications; although the main intention of the creator of this application is education and protection
An awesome app that offers comprehensive theoretical and practical knowledge regarding computer hacking. Not only it enables broadening of knowledge, but also helps with the diagnosing any computer issue.
Improve your technical life with smart and cool tips and hacking tricks. Learn a new trick regularly and astound your friends.
This is an extraordinary tutorial which offers you extensive knowledge regarding hacking techniques such as securing pen drives, WiFi addresses or Wireless routers.
For becoming an ethical hacker, you need to understand the tricks of black hat hackers. This is among the best hacking tutorial apps for utilizing black hat methods.
It is a fact that hacking of any computer requires a comprehensive knowledge of multiple topics. Learning computer hacking not only offers a new career path but also enables the user to diagnose and correct computer issues, both of which is provided by this application.
Use this application to learn hacking android apps, and get comprehensive information regarding the phishing, footprinting, batch file viruses, and worms.
An excellent reference point for both pro and newbies, this application offers information regarding terms and their use in a hacking universe such as bot.net, difference between hex and binary.
A community-based effort, this hacking tutorial covers various tips and techniques that can be used to become a security professional and covers a vast range of topics such as hacking basics to security management techniques.
This is one of the best android hacking tutorials with active participation technique that enables you to master hacking skills easily. It is best for beginners who want to learn advanced hacking techniques.
Improve Programming And Coding Skills
1. HackerRank :
The HackerRank Community is one of the largest learning and competition community for programmers. They have exercises related to Python, Java, SQL, C++, Linux Shell and lots more. You will be able to learn new programming topics and techniques by going through the challenges on HackerRank. Many challenges will also involve a competition between your bots and the bots coded by other hackers, so may the best hacker win
2. HackerEarth :
HackerEarth is an online skill assessment tool for conducting programming tests to evaluate developers. Supports almost all famous programming languages.
3. CodeChef :
CodeChef was created as a platform to help programmers make it big in the world of algorithms, computer programming and programming contests. It is a not-for-profit educational initiative by Directi, an Indian software company and a global programming community that fosters learning and friendly competition.
4. Exercism :
Exercism is another tool to level up your programming and coding skills. Exercises are suitable for both code newbies and experienced programmers. You can download and pratice problems over 30 different programming languages.
5. Codeforces :
Codeforces is a Russian website dedicated to competitive programming. They provide different mode of services like — participation in the short (2-hours) contests, challenge/hack other contestants solutions, ability to solve problems from previous contests for training purposes and many other.
6. Sphere Online Judge (SPOJ) :
SPOJ (Sphere Online Judge) is an online judge system with over 200,000 registered users and over 20,000 problems. Tasks are prepared by its community of problem setters or are taken from previous programming contests. SPOJ allows advanced users to organize contests under their own rules and also includes a forum where programmers can discuss how to solve a particular problem.
7. CodingBat :
CodingBat is a free site of live coding problems to build coding skill in Java and Python. CodingBat problems work great as homework, or for self-study practice, or in a lab, or as live lecture examples.
8. Project Euler :
Project Euler is a series of challenging mathematical/computer programming problems that will require more than just mathematical insights to solve. Although mathematics will help you arrive at elegant and efficient methods, the use of a computer and programming skills will be required to solve most problems.
9. CodeEval :
CodeEval is a platform used by developers to showcase their skills. Developers can participate in app building competitions and win cash/prizes. They can also solve programming challenges as a way to impress employers with their technical skills.
10. TopCoder :
Topcoder is one of the world’s largest community of competitive designers, developers, and data scientists. Topcoder hosts fortnightly online competitive programming competitions—known as SRMs or “single round matches”—as well as weekly competitions in graphic design and development.
11. Google Code Jam :
Google Code Jam is an international programming competition hosted and administered by Google. The competition consists of a set of algorithmic problems which must be solved in a fixed amount of time. Competitors may use any programming language and development environment to obtain their solutions.
12. LeetCode Online Judge :
LeetCode OJ is a platform for preparing technical coding interviews. Pick from an expanding library of more than 190 questions, code and submit your solution to see if you have solved it correctly. Supports 9 programming languages: C, C++, Java, Python, C#, JavaScript, Ruby, Bash, MySQL.
That’s it enrich your programming and coding skill with the help of these websites and also don’t forget to share it with your coder buddy.
Wednesday, 28 December 2016
How To Set-up VPN on Android Devices (No Software Needed)
With hackers and in fact sometimes our own governments lurking around, looking for just one opportunity to steal your data, you might want to give serious reconsideration before connecting. Somehow the idea of my bank credentials and personal information resting in someone else’s hands doesn’t seem to be very enthralling to me.
So how to overcome this problem? Simple just configure a Virtual Private Network (VPN).
A VPN would allow you to connect your device up to a secure connection to another network over the internet. In fact you can use it to access your home/company network while you are away, download apps which are not available in your country or simply keep your browsing and data secure over the public network.
So here is how to go about setting a VPN on your Android device:
Step 1. Go to Menu > Settings

Step 2. Now Click on More

Step 3. Now click on VPN and a screen like this one would open up:

Step 4. Now tap on the ‘+’ button at the right corner of the screen:

Step 5. Here enter a Name for the VPN connection, select the type of VPN server you are connecting to and enter the VPN server’s address and then click save.

Step 6. Now just tap on the created VPN to connect. You will be prompted to enter a username and password. After entering which you can connect to the VPN.

Once you are connected you will see a Key Icon / “VPN activated” notification in the notification drawer. In case you want to disconnect, simply tap on the notification and tap Disconnect.
Bonus Tip: In case you want to ensure that your data is always sent over a VPN, for instance while using a public Wi-Fi network all you need to do is this:
Connect to a VPN, save your account information and then click on the three dots icon at the corner of the screen. After that click on the ‘Always-On VPN’ icon to access this feature.

Note: I would advise readers to change their Screen Lock over from ‘Slide’ to ‘Pin’ or ‘Password’ otherwise they might get this error:

Also, sometimes you might be prompted with this:

Be careful because randomly entering passwords may cause your credential storage to be erased.

Now there is absolutely no need to freak out. Here is where our first tip would come in handy, just simply change your PIN and the question will go away as the credentials would have been forced to be updated.
Monday, 26 December 2016
Switch Vs Router: Differences And Comparison Of Their Working Functionalities
Switches are very popular as a layer two device whereas a router is very famous for being a layer three device. So, what is that something special that makes router the most popular layer three device? We will take a look at all the differences and functional aspects of a switch and a router
Let’s take a look:
Switch vs Router — Comparison and differences
Switch’s properties:
Works at the Data link layer of the OSI layerUses ‘filter and forwarding’ when it receives a data packet in form of a frameA virtual LAN can be created using a Switch which inside the same LAN separates the LANs and make them virtual to each otherUsually comes with 24 to 48 portsTransmits Frames (layer 2 packets) and Layer 3 packets of the OSI modelUses its software for admin access and other configurationsHas its own memory for memorizing the devices connected over to the networkCan learn the MAC addresses and stores those addressed in a CAM (Content Addressable Memories)Supports Half as well as full duplex transmission modeA hub has only one broadcast domainCan support Spanning tree protocolNo packet collisions occur commonly inside a SwitchNo dynamic sharing of the bandwidth
Router’s properties:
Connects more than two networks unlike a SwitchWorks as a traffic police to direct a data packetCan be used for LAN, MAN, and WANIts packet is called a packet unlike a frame at layer two and electrical signal at layer oneIt works at layer three or also known as network layer of the OSI layerIt usually has 2-4-8 portsIt also stored Ip addresses in a table called Routing table and from there, it decides where to send the data packetIn router, every port has its own broadcast domainDynamic bandwidth sharingFaster processing than a switchCan perform Network Address Translations (NAT)
Working differences — Switch vs router
Before you proceed to further reading, have a look at the basic concepts of the different networking devices and hardware types — hub, switch, router, modem, bridge, repeater.
Let’s say around fifty computers are connected in a local area network. In the network, there is also a common resource from where computers can download data locally. So, this network forms a kind of a private network. However, when one of the computers would want to get some data from online sites like Facebook or Google, they will have to go to the internet and fetch the data and that makes a public network
So, when a computer wants to access a public network, it sends a data packet to the Switch which is the next immediate device in terms of data transmission. The switch opens up the packet and looks for the destination where the request packet wants to go.
The packet is directed for the public internet or world wide internet and Switch has no idea about it. So, Switch forwards this packet to the router — ‘The default gateway’. A router works as a gateway that is more like it is a door to the outside world and gets the data that a particular computer wants.
However, inside the campus, all the computers are a part of the private network which is not known to the outside world. So, it tweaks the private packet into the public packet and vice versa. This is called NATting which we will cover in the later topics.

What Is HTTP/2 And How It Works
HTTP 1.1 was a major move from HTTP 1.0 as it allowed persisted connections (more than one request/response on the same HTTP connection), improved caching, new status code, Enhanced compression support, OPTION method for Cross Origin Resource Sharing in web application and much more.
HTTP/1.1 has served the Web well for more than fifteen years, but its age is starting to show. Loading a Web page is more resource intensive than ever, and loading all of those assets efficiently is difficult because HTTP practically only allows one outstanding request per TCP connection.
Because of which, many TCP connections are created to issue parallel requests. And since there isn’t any limit on this; too many connections are used most of the times which leads to TCP congestion and unfair resource usage by browsers. It also means lots of duplicate data being transferred “on the wire”.
If too many requests are made, it hurts performance. This has led the industry to a place where it’s considered Best Practice to do things like spriting, data: inlining, domain sharding and concatenation. These hacks are indications of underlying problems in the protocol itself, and cause a number of problems on their own when used.
HTTP/2, on the other hand, enables a more efficient use of network resources and a reduced perception of latency by introducing header field compression and allowing multiple concurrent exchanges on the same connection. It also introduces unsolicited push of representations from servers to clients. This specification is an alternative to, but does not obsolete, the HTTP/1.1 message syntax. HTTP’s existing semantics remains unchanged.
At a high level, HTTP/2:
is binary, instead of textualis fully multiplexed, instead of ordered and blockingcan, therefore, use one connection for parallelismuses header compression to reduce overheadallows servers to “push” responses proactively into client caches
Wednesday, 21 December 2016
Difference Between HDMI, VGA, DisplayPort, DVI, Thunderbolt, And MHL
If you want to connect your laptop to your TV or monitor, the most common thing to go for is HDMI. However, there are other cable options like DisplayPort, DVI, Thunderbolt, and VGA which are in existence since almost three decades.
All these different interfaces have been designed to carry video signals (and audio signals) from one device to another. So, what’s the thing which sets them apart? If you’re thinking it’s the video quality, then you might be correct only in the case of VGA. As for other connection interfaces, the video quality is almost the same.
VGA
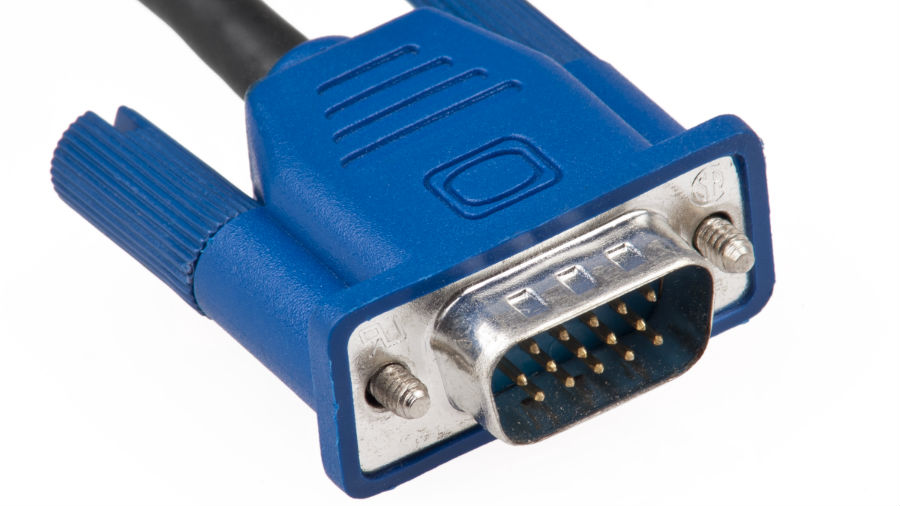
It stands for Video Graphics Array and it’s probably the oldest display connector which can still be seen on a number of devices. I have a VGA port on my old Dell Inspiron. But the VGA connector, for obvious reasons, has started to lose its place on various devices for more advanced technologies. HDMI is an alternative in most cases. For Apple, Intel’s Thunderbolt is the interface used to push video content out of their laptops to display device.
VGA was originally created in the year 1987 by IBM as a display hardware. But it is widely recognized by people as the 15-pin D-Sub connector on the desktop machines which comes with screws to lock the connector with the VGA port.
VGA can support a video resolution of 1080p (and higher), but that’s not the thing which can help it to compete against newer technologies. This is because VGA uses analog signals to carry video from source to the receiving device. And it contributes to a degraded picture quality, often visible when compared to other interfaces based on digital signals.
A separate audio connection is required if you want to throw videos using VGA cables as it lacks support for the same. The length of the VGA cable, in addition to the quality of the material, can affect the intensity of signal degradation. Moreover, a low-quality VGA cable may also suffer from signal crosstalk or ghosting, in which signals from other wires in the vicinity can introduce unwanted currents.
DVI
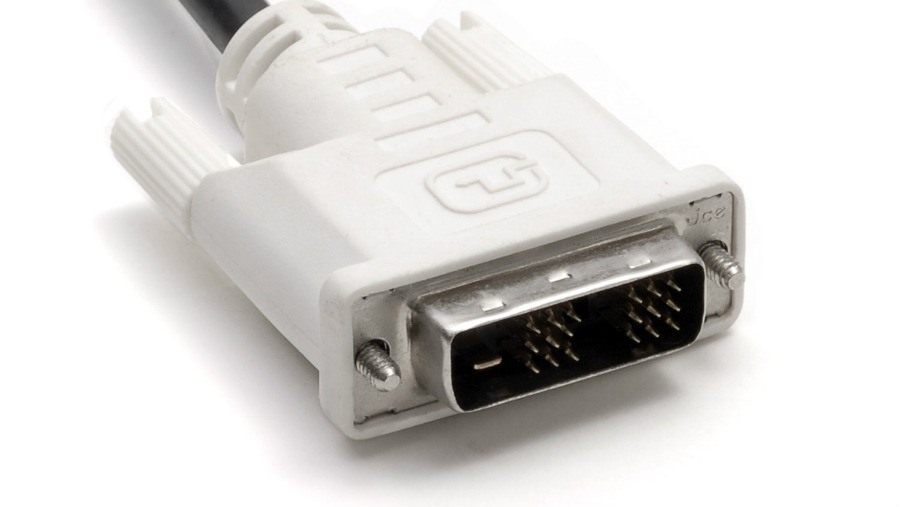
Digital Visual Interface is the one to follow the legacy of the VGA connector, but by taking the digital path. DVI, created by Digital Display Working Group, was introduced in the year 1999. The 29-pin connector shares visual traits with VGA connector and sports the screw locks.
DVI interface can push uncompressed digital video streams to a receiving device. In the case of digital signals, it can support WUXGA (1920x 1200) resolution @ 60 Hz via Single Link, and WQXGA (2560 x 1600) @ 60 Hz via Dual Link.
DVI also supports analog video output which makes it backward compatible (using an adapter) with the VGA interface. DVI might be relatively newer than VGA, it has mainly found its place on computer monitors. However, the technology is also on the verge of extinction.
DisplayPort
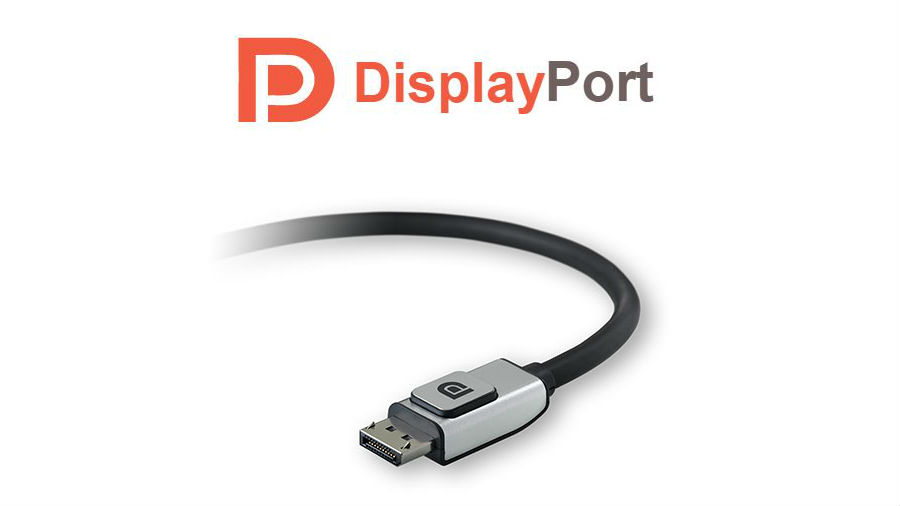
Launched in 2006, DisplayPort is a lot younger in comparison to VGA and DVI, and even HDMI. It is backward compatible with these interfaces. Just like DVI, it is primarily intended to be a computer connection interface.
According to the newest DisplayPort 1.4 specifications, it can support HDR and up to 8K video output on compatible devices. It also deploys a something known as Display Video Compression, which is claimed to deliver visually lossless video over a DisplayPort connection. Nvidia’s GeForce GTX 1080 is the world’s first graphics card to feature DisplayPort 1.4.
VESA, the creator of DisplayPort wants to put it as a considerable option for audio/video connection. They’re constantly adding support for various technologies to maintain pace with HDMI. Dynamic metadata support is available with DisplayPort 1.4 for HDR-compatible devices. It allows content creators to configure HDR for individual scenes.
An advantage of using a digital video connection is the implementation of DRM to prevent unauthorized playback of copyrighted content. Earlier versions of DisplayPort added support for DPCP (128-bit AES encryption), but the 56-bit HDCP was favored with the release of DisplayPort 1.1. Now DisplayPort 1.3 comes with HDCP 2.2.
DisplayPort comes with various other perks. A variant known as DisplayPort++ (or Dual-Mode) can be used to throw out HDMI and DVI-compatible video content using the same hardware. Also, VESA has figured out a method to use Type-C USB as a DisplayPort output source. It is known as DisplayPort Alternate Mode, and it doesn’t require any adapter. So, if you are among the ones who purchased the single port Macbook, then you should be thankful to that particular port.
Furthermore, DisplayPort can produce output for more than one monitors using a single port. Multiple monitors can be added either by daisy chaining or using a hub.
HDMI
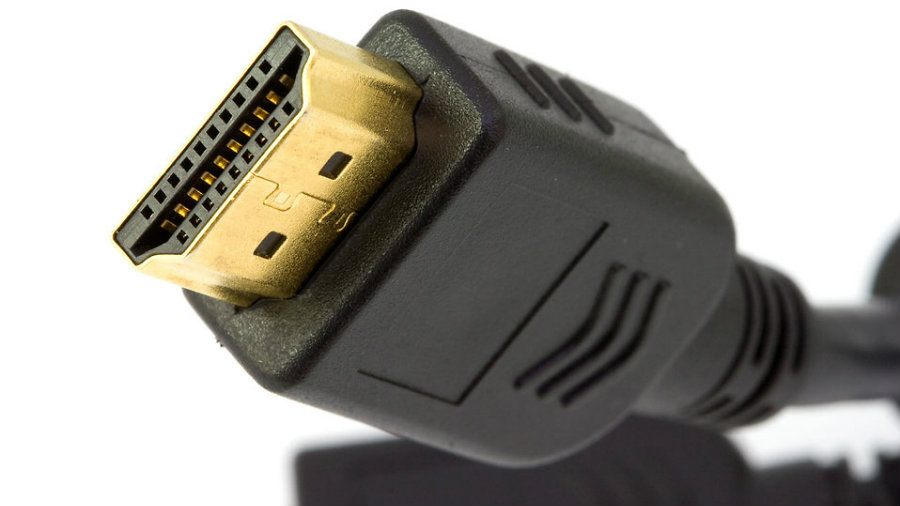
High-Definition Multimedia Interface is a proprietary video interface. You can find HDMI ports on almost every consumer electronics including televisions, monitors, DVRs, music systems. etc. HDMI 2.0 supports video output resolutions up to 4K (4096 x 20160p @ 60Hz). Future version i.e. HDMI 2.1 might arrive with support for an 8k resolution.
An HDMI hub or splitter can be used to deliver video output to multiple monitors. But daisy chaining in the case of HDMI is not an easy task in comparison to DisplayPort. Since, the release of HDMI 1.3, it has started to feature an Ethernet link (capable of transferring data at 100Mbps) in the cable itself. Another notable HDMI feature is ARC (Audio Return Channel) which enables transfer of audio from a source (television etc) to a receiver (for instance, connected speakers). Earlier, it was done using a sperate audio cable.
Talking about cables, they come in standard and high-speed cable options, both with and without an ethernet link. HDMI also implements content protection via HDCP. Moreover, a single remote control can be used to control various CEC (Consumer Electronics Control)-enabled devices connected over HDMI.
Similar to DisplayPort, an Alternate Mode using Type-C USB can be used to connect an HDMI-compliant device to a receiving device.
Thunderbolt
It’s an Intel-designed multipurpose interface which is intended for video output as well as connecting storage devices. Other than display, you can find a number of hard drives and SSDs using Thunderbolt port for connection. Thunderbolt isn’t present on many devices as it has been in existence since the last five years only. Apple was quick to put Thunderbolt ports on its Macbook Air and Pro laptops.
Earlier versions of Thunderbolt (1 & 2) interface utilized the mini DisplayPort connector. In the case of Thunderbolt 3, USB Type-C is used as the connector.
Thunderbolt 3 supports a maximum theoretical bandwidth of 40Gbit/s, capable of pushing video streams on two 4K displays at the same time. A single Thunderbolt port can connect up to 6 devices via daisy-chaining or a hub. By using the Type-C connector, it can also leverage the USB Power Delivery feature which can be used to charge a connected device using up to 100 watts of power.
MHL
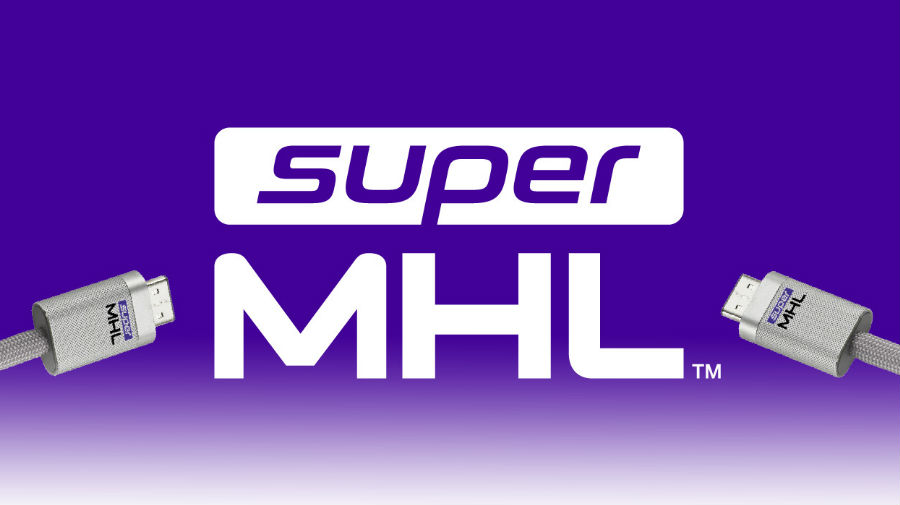
Mobile High-Definition Link is an interface created for portable devices including mobile phones. MHL can be thought of as a spin-off version of HDMI. It was first proposed by Silicon Image which also had a significant contribution in the development of HDMI.
The initial version of MHL was capable of delivering 1080p video output along with eight channel audio. It also had features like HDCP and could be used to control CEC-enabled devices.
MHL 3 introduced support for 4K 30fps videos along with HDCP 2.2 and improved 7.1 surround audio. On mobile devices, it uses the micro-USB 2.0 port to connect to a display device using an MHL to HDMI adapter.
The latest version, superMHL, adds support for 8K videos at 120fps, Dolby Atmos, HDR, etc. It also brings a new reversible superMHL connector into the picture. Also, you can connect multiple displays to a single superMHL port. Just like HDMI, DisplayPort, and Thunderbolt, there is an MHL Alternate Mode for USB Type-C.
Winding Up
So, these were some of the interfaces designed to send audio/video content from one device to another. Clearly speaking, for VGA and DVI, most of their territory is acquired by newer alternatives, namely HDMI and DisplayPort.
If we try to compare DisplayPort and HDMI, DisplayPort may have an upper hand in the specifications department, but the reality is that HDMI has already captured most of the market. And now, makers of DisplayPort have started pushing their technology in the consumer space. Otherwise, DisplayPort has been mainly present on monitors and graphics cards.
Intel’s Thunderbolt is yet to make an impact. But thanks to the companies who have started giving Thunderbolt a place on their devices. Similarly, MHL has also existed for a small amount of time, but its utility in small devices, often compromising on space, has helped it speed on the success route.
For the time being, you can stick to HDMI for most of the time. But MHL is also touting itself as a promising technology for the future. And so is the case of DisplayPort. Intel Thunderbolt is posing itself as a one-stop solution for your various connection needs. Above all, a sense of relief is the implementation of USB Type-C for these different interfaces, which can also eliminate the requirement of different ports on a single device.
How to Erase Your Web Accounts in One Click
http://www.makeuseof.com/tag/how-to-erase-your-web-accounts-in-one-click/
How to Access Blocked Websites
Here are some ways to access your favourite blocked website
1. Become Anonymous: Use Proxy Websites
Very often, in a professional environment, the employers draw certain boundaries, restricting your the access to some particular websites. At times, you need a way to access the blocked websites and in those situations, proxy websites act as a rescue method.
On the web, there are hundreds of proxy websites that make your web experience ‘unrestricted’. A proxy website becomes a moderator between the user and server site. The proxy website camouflages the blocked site from the ISPs and allows you to access blocked websites. To get a proxy website for any blocked site, just perform the Google search.
Eg: Facebook Proxy Server. In case, Facebook is blocked in your institution, or you can go to —
http://www.spysurfing.com/
https://www.hidemyass.com/
http://proxify.us/p/ and more…
2. Use VPN
VPN or Virtual Proxy Network allows you to connect your device to a secure connection to another network over the internet. VPN enables you to access blocked websites from your home network and puts your IP address in a land far away. You can also download the apps or open the sites blocked in your country.
VPN acts as a tunnel that converts your data into garbage value that’s difficult for anyone to sniff and recognize. There are tons of free/cheap VPN services that one can use and enjoy an uninterrupted internet experience.
If you are into exploring ways to enhance your computer security, you can also go for the deadly combination of TOR and VPN.
Check out our how to set-up VPN on Android devices without the need of any software. You can also read our detailed article on what is VPN and how it works.
3. Use IP Rather Than URL
The blocked website sometimes are stored as a list of URLs and using IP of the website might work in few of the cases. To get the IP address for any website, you do a ping domain.com command in Command Prompt. Using IP is a simple way to access blocked websites in your region. However, if the website had hidden its IP too, then it won’t open with this method.
All you need to do is run CMD on your computer. Now type “ping www.websitename.com” and press Enter. This will promptly return the IP address. Now enter this IP address in your web browser’s address bar and hit Enter.
4. Change Network Proxy In Browsers
Your college or institute might be having more than one proxy for its network. So, it happens that some websites are restricted on one proxy, but accessible in another. So, you can give a try to proxy surfing to access blocked websites in your college.
Disabling the network proxy settings in our web browsers isn’t a tough task. You just need to find the connections/network option in the settings of your web browser. There, you can select the no proxy option or use another one that’s providing unrestricted browsing at your institution.
5. Use Google Translate
Institutes or even countries sometimes don’t ban Google Translate. So, you can bypass the restriction by converting the blocked website into some other language that you may know. Try Google Translate and see for yourself. It is yet another simple way to access blocked websites.
You can also use Microsoft’s Bing translation service to unblock a banned website.
6. Bypass via Extensions
If the websites that are blocked by your institute or office are dynamic in nature such as Facebook or YouTube, then you should give a try to these extensions. Hola and ProxMate are some extensions that you can use to access blocked websites.
7. URL recasting
There are instances when a particular website is hosted in VPN and it doesn’t have a verified SSL installed. For such websites, you can simply go to the address bar of your web browser and try typing https://www.url.com, instead of accessing www.url.com or http://www.url.com. This change might display a security notice. Press on the Proceed Anyway option and visit the website.
8. Replace your DNS Server
We’ve already discussed this method under a separate topic named DNS Hack. You can simply use this method and bypass the blockade. This method generally involves using Google DNS or OpenDNS for accessing the internet.Here are the detailed steps on the same.
9. Go to Internet Archive — Wayback Machine
Wayback Machine is an interesting service that stores a copy of most of all website on the internet. It saves multiple versions of a website and you can use it to access the past versions of a website. The users can also use it to browse the blocked content online.
10. Use RSS Feed
RSS readers are useful for getting the fresh content and reading them with ease. You can grab the RSS feed of the blocked website and add it to your reader. Just in case that website doesn’t have an RSS feed, there are some useful online services to create the feed.
These are some of the most effective and easy to use methods to circumvent the censorship that has been put on your favorite websites.

Tuesday, 20 December 2016
Why Is Google Trying To Murder HTTP Connection Used By Websites
Modern times have witnessed a more sophisticated way of stealing data and stalking a person on the internet. The HTTP connection used by many websites is enough to lure malevolent minds to fulfill their intentions. Google is determined to demote the adoption of HTTP connection by websites.
The reason behind this objective is that the HTTP connection is not secure. What does that mean? If a website uses an HTTP connection, the passwords and credit card details you type there are sent in plain text over the network making it possible for any middleman to read all of it. And it is not only about the credit card numbers, a website using an HTTP connection can be modified by a person before it reaches your computer.
Another matter of concern is that people don’t give a second thought while accessing a website that’s not secure. The security indicators placed in web browsers are left unnoticed. Hence, the situation becomes more alarming.
Google wants the websites to shift to the HTTPS connection which uses SSL/TLS encryption to send data. So, when you type your credit card numbers they are converted into random-looking characters before being sent over the network.
“Beginning in January 2017 (Chrome 56), we’ll mark HTTP sites that transmit passwords or credit cards as non-secure, as part of a long-term plan to mark all HTTP sites as non-secure,” writes Emily Schechter, Google Security Team.
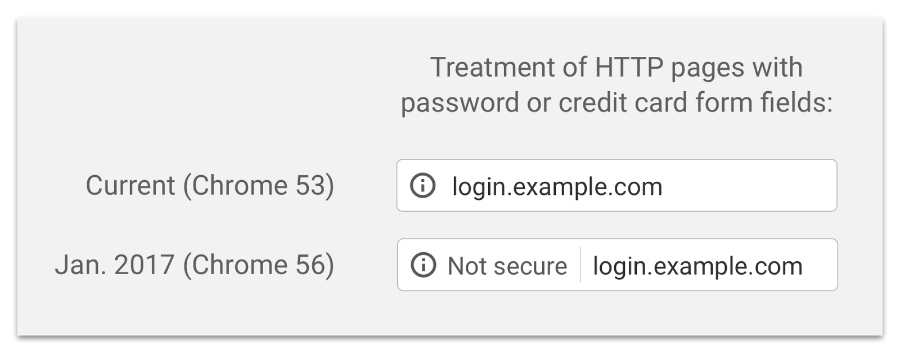

Schechter notes that a significant number of websites have transitioned to HTTPS and the number is increasing. “We recently hit a milestone with more than half of Chrome desktop page loads now served over HTTPS,” she writes.
In the coming months, Google will extensively encourage the frequency of “not secure” warning label on HTTP web pages in Google Chrome. Initially, HTTP warnings would be displayed in incognito mode and for all the web pages after some time.
HTTPS has many advantages over the HTTP connection and it helps in protecting your confidential information. Google is not alone acting to boost the adoption of HTTPS. A few months ago, the website hosting platform WordPress turned on HTTPS for all of its websites for free. Check out how an HTTPS page loads faster than an HTTP page.


How To Download YouTube Videos Using VLC Media Player
VLC is one of the most popular media players around. This free and open source media player became popular a long time ago as it was one of the first ones that “played anything”. Its simple UI can disguise the new users who might consider it less advanced. Few people know that VLC media player packs a wide range of features.
In our previous article, we’ve already told you how to convert a media file to any different format using VLC. In this article, I’m going to tell you how to download videos from YouTube using your favorite VLC media player.
Steps to download YouTube videos using VLC?
The method to download YouTube videos using VLC media player is very simple. Here are the steps that you need to follow to complete this task:
The first step involves opening some YouTube video and copying its URL from your web browser’s address bar. Here, I opened the Fossbytes YouTube channel and looked for the how to make Chrome faster tutorial. After that, I simply copied the path of the video from the address bar. Now you need to open VLC media player on your computer. I’ve written this tutorial using Windows 10. So, the appearance and placement of different options might differ on your Mac or Linux PC.In VLC, find the Open Capture Device option and click on it. It should open a new window.
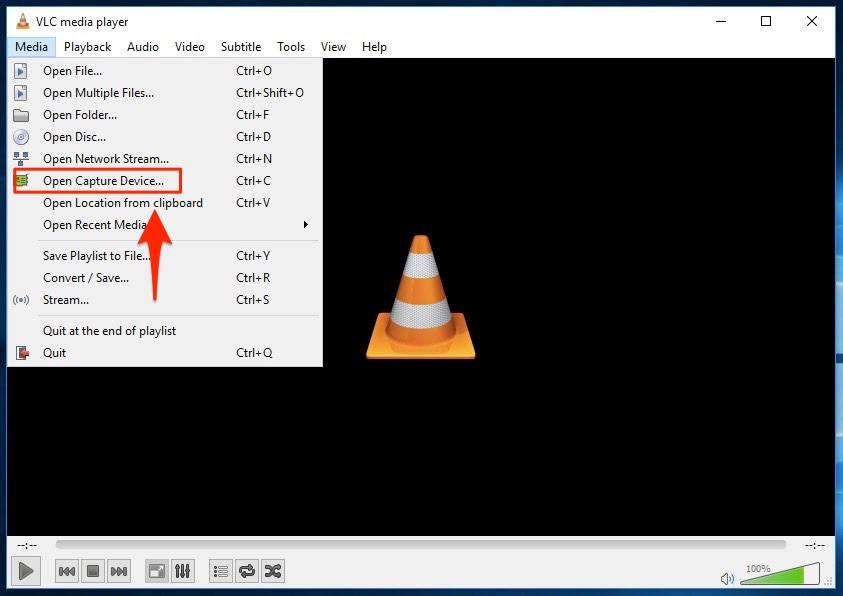 Now click on the Network tab and paste the copied URL in the empty field that’s titled Please enter a network URL. Now click Play button.
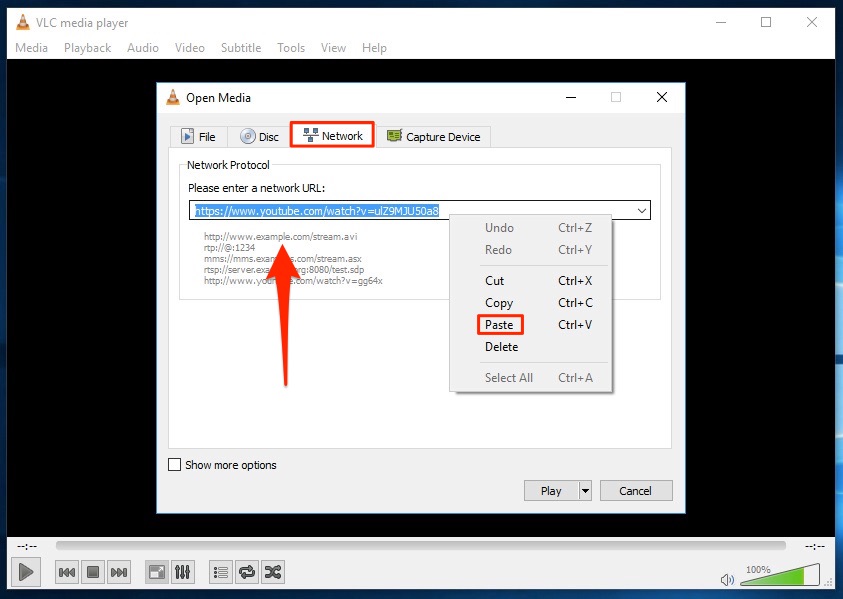 This should soon start playing the YouTube video in your VLC media player. You can use the media controls in VLC just like the YouTube controls and use them to play, pause, or stop the playback.
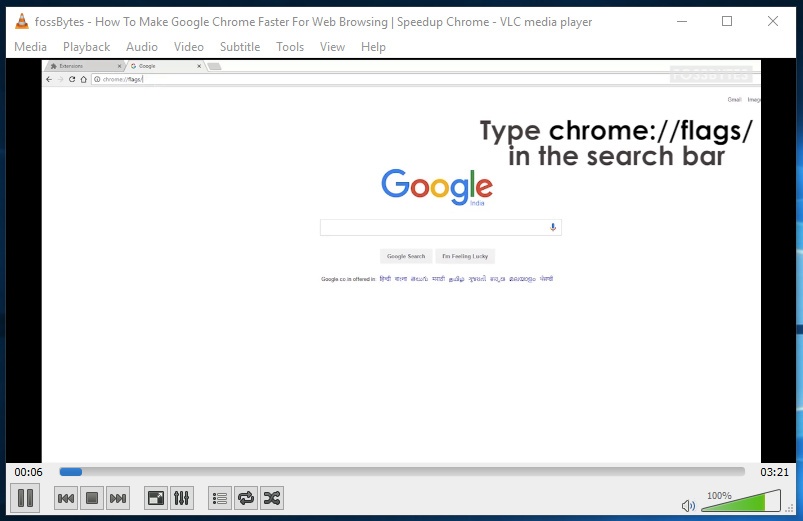 Now, in Tools option, click on Codec information.
 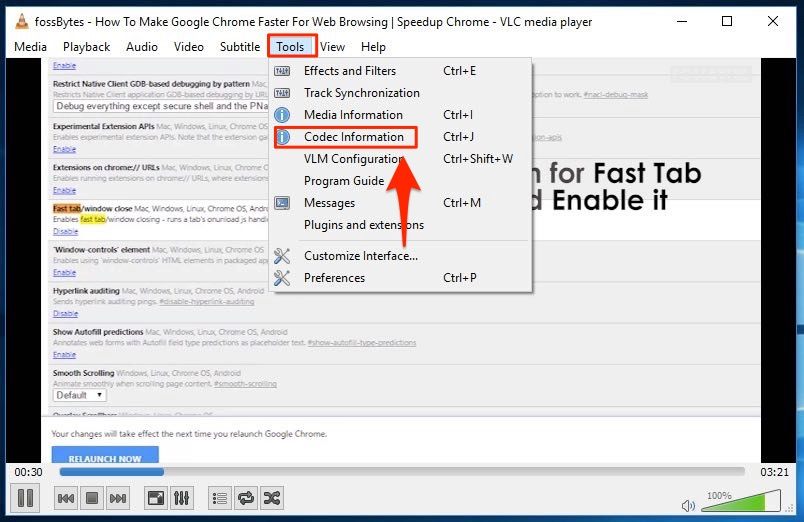 It’ll open the Current Media Information window that’ll show codec information. There’ll be a link under Location. It’s basically the download link and you need to copy it.
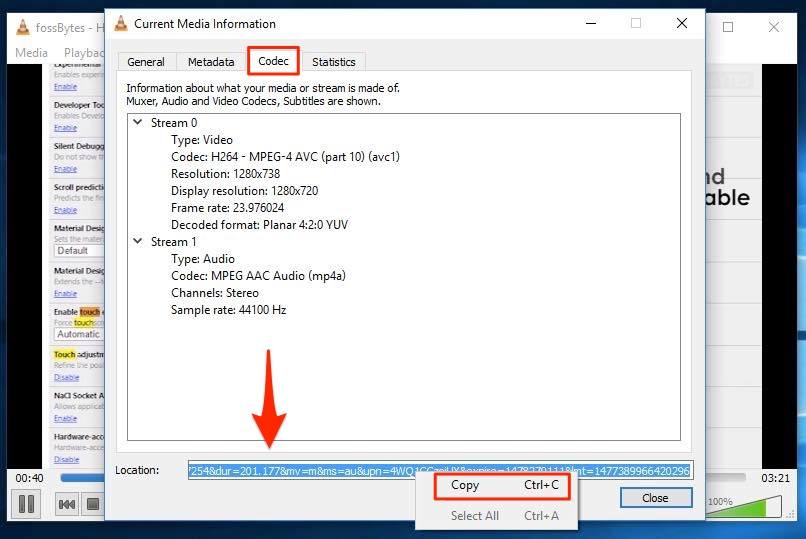 Now you need to open your web browser and paste the copied download link in the address bar and hit Enter. This would either start the video playback in your web browser or directly show you the download dialog. Simply click on the Savebutton to grab the video.
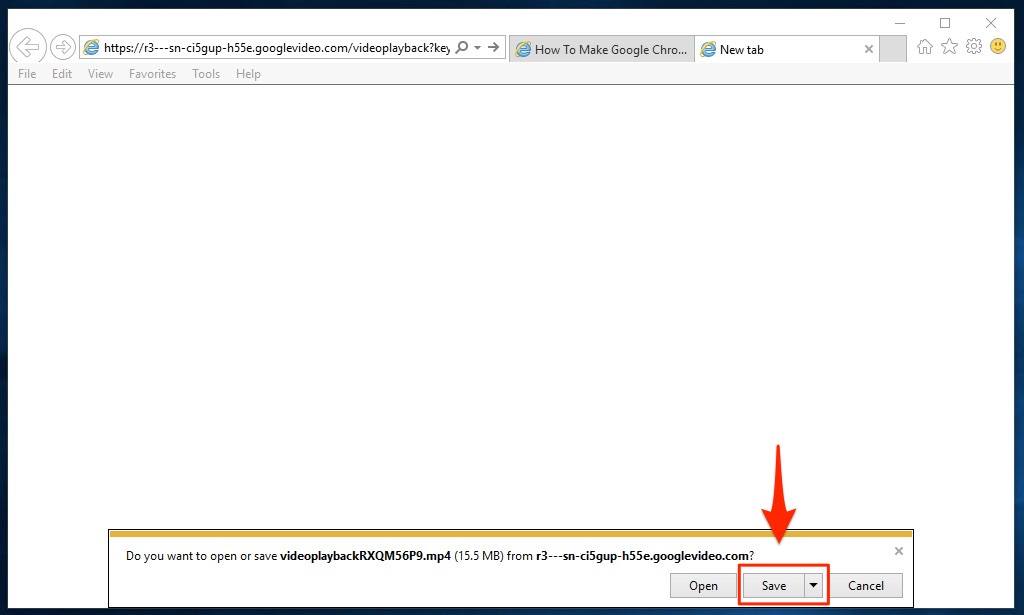 Here’s the downloaded video in all its glory:
Saturday, 17 September 2016
How to Fix Windows 10 Slow Performance Issue and Increase Overall System Speed
 Short Bytes: Many Windows users are facing Windows 10 slow performance issue in Windows 10. This appears in the form of input lags and could be fixed by tweaking some Page File settings in Windows 10. So, how to fix this slow performance issue in Windows 10 to boost system speed? Here is the answer.
How to Fix Windows 10 Slow Performance Issue and Boost your System Speed?
How to fix Windows 10 Slow performance:
- Open Start Menu and find the Control Panel. Click on it.
- Here in the Control Panel, go to the Search field at the top-right of the window and type Performance. Now hit Enter.
- Now find Adjust the appearance and performance of Windows.
- Go to the Advanced tab and click on Change in the Virtual Memory section.

- Now untick the option “Automatically manage paging file size for all drives.”
- Select the default C: drive where Windows 10 is installed and then choose Custom Size. Then change Initial Size and Maximum Size to the recommended values by Windows (given below).
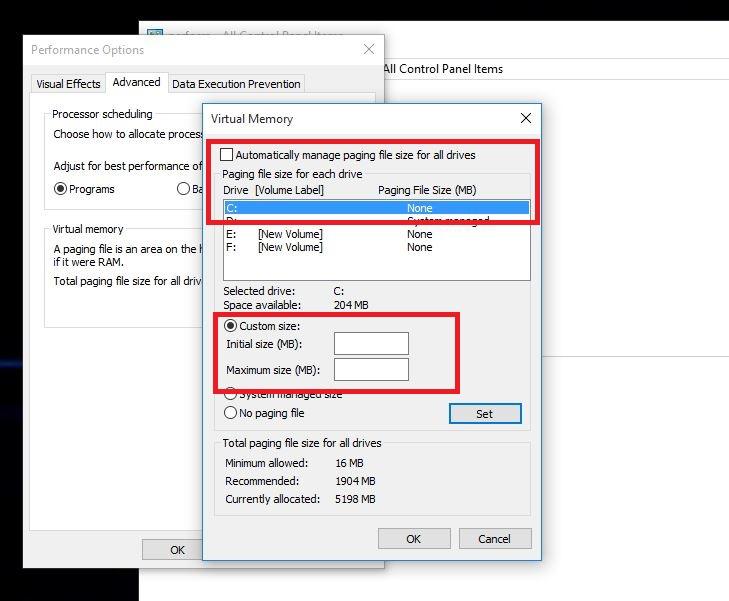
- Now click Set and then hit OK to save the settings.
- Reboot the computer for the changes to take effect and fix the slow performance issue in Windows 10.